Each virtual machine (VM) is an independent system with an independent set of virtual hardware. Its main features are the following:
- A virtual machine resembles and works like a regular computer. It has its own virtual hardware. Software applications can run in virtual machines without any modifications or adjustment.
- Virtual machine configuration can be changed easily, for example, by adding new virtual disks or memory.
- Although virtual machines share physical hardware resources, they are fully isolated from each other (file system, processes, sysctl variables) and the compute node.
- A virtual machine can run any supported guest operating system.
The following table lists the current virtual machine configuration limits:
| Resource | Limit |
|---|---|
| RAM | 1 TiB |
| CPU | 64 virtual CPUs |
| Storage | 15 volumes, 512 TiB each |
| Network | 15 NICs |
Supported Guest Operating Systems:
The guest operating systems listed below have been tested and are supported in virtual machines.
Note: Only the x64 architecture is supported.
Windows virtual machines:
| Version | Edition | CPU hot plug support | RAM hot plug support |
|---|---|---|---|
| Windows Server 2022 | Standard | Yes | Yes |
| Windows Server 2019 | Standard | Yes | Yes |
Linux virtual machines:
| Distribution | Version | CPU hot plug support | RAM hot plug support |
|---|---|---|---|
| AlmaLinux | 8.x, 9.x | Yes | Yes |
| CentOS | 8.x, 7.x | Yes | Yes |
| 6.x | No | No | |
| Debian | 10.x, 9.x | Yes | Yes |
| RockyLinux | 8.x, 9.x | Yes | Yes |
| Ubuntu | 22.04.x, 20.04.x, 18.04.x | Yes | Yes |
| 16.04.x | No | No |
Creating Virtual Machines:
Limitations:
UEFI boot is not supported for CentOS 7.x virtual machines with less than 1 GiB of RAM.
Prerequisites:
- You have a guest OS source prepared, as described in Managing Images.
- One or more compute networks are created by using the instructions in Managing Virtual Private Networks.
- [Optional] Custom security groups are configured, as instructed in Managing Security Groups.
- [Optional] An SSH key is added, as outlined in Managing SSH Keys. You can specify an SSH key only when creating VMs from a template or boot volume.
Creating Virtual Machine:
On the Virtual machines screen, click Create virtual machine. A window will open where you will need to specify the VM parameters.
Specify a name for the new VM.
If you have a compute boot volume:
Select Volume in the Deploy from section, and then click Specify in the Volumes section.
In the Volumes window, click Attach.
In the Attach volume window, find and select the volume, and then click Attach.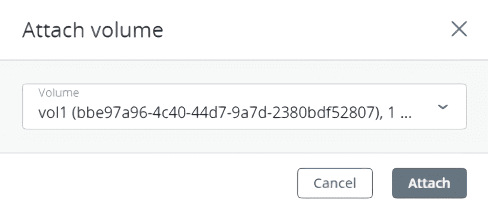
If you attach more than one volume, the first attached volume becomes the boot volume, by default. To select another volume as bootable, place it first in the list by clicking the up arrow button next to it.
Note: If you select an image or volume with an assigned placement, the created VM will also inherit this placement.
After selecting the boot media, volumes required for this media to boot will be automatically added to the Volumes section.
Configure the VM disks:
1) In the Volumes window, make sure the default boot volume is large enough to accommodate the guest OS. Otherwise, click the ellipsis icon next to it, and then Edit. Change the volume size and click Save.
2) [Optional] Add more disks to the VM by creating or attaching volumes. To do this, click the pencil icon in the Volumes section, and then Add or Attach in the Volumes window.
3) Select volumes that will be removed during the VM deletion. To do this, click the pencil icon in the Volumes section, click the ellipsis icon next to the needed volume, and then Edit. Enable Delete on termination and click Save.
4) When you finish configuring the VM disks, click Done.
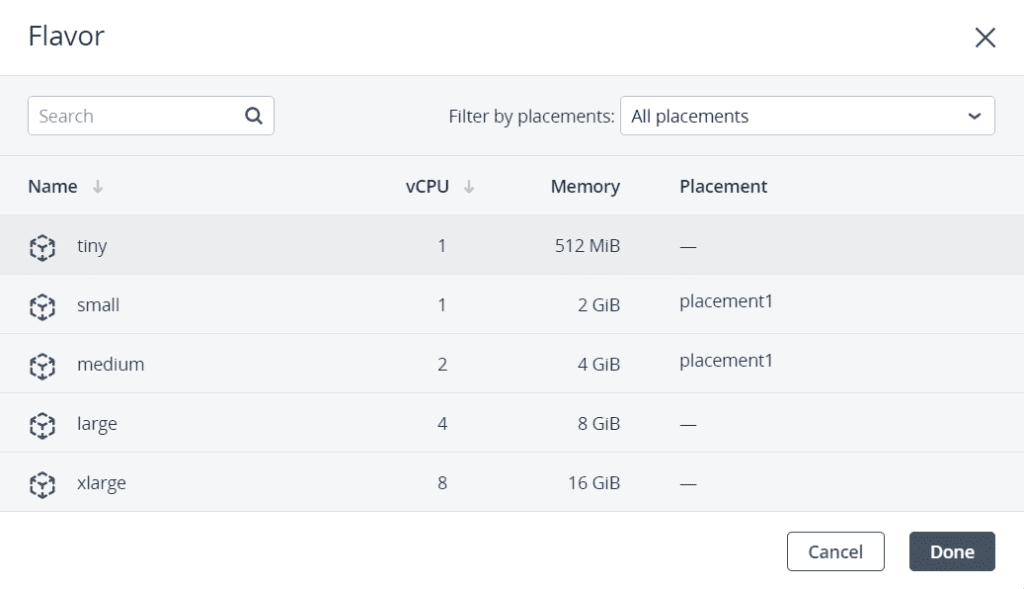
5) Choose the amount of RAM and CPU resources that will be allocated to the VM in the Flavor section. In the Flavor window, select a flavor, and then click Done.
Important: When choosing a flavor for a VM, ensure it satisfies the hardware requirements of the guest OS.
Note: To select a flavor with an assigned placement, you can filter flavors by placement. The VM created from such a flavor will also inherit this placement.
Add network interfaces to the VM in the Networks section:
- In the Network interfaces window, click Add to attach a network interface.
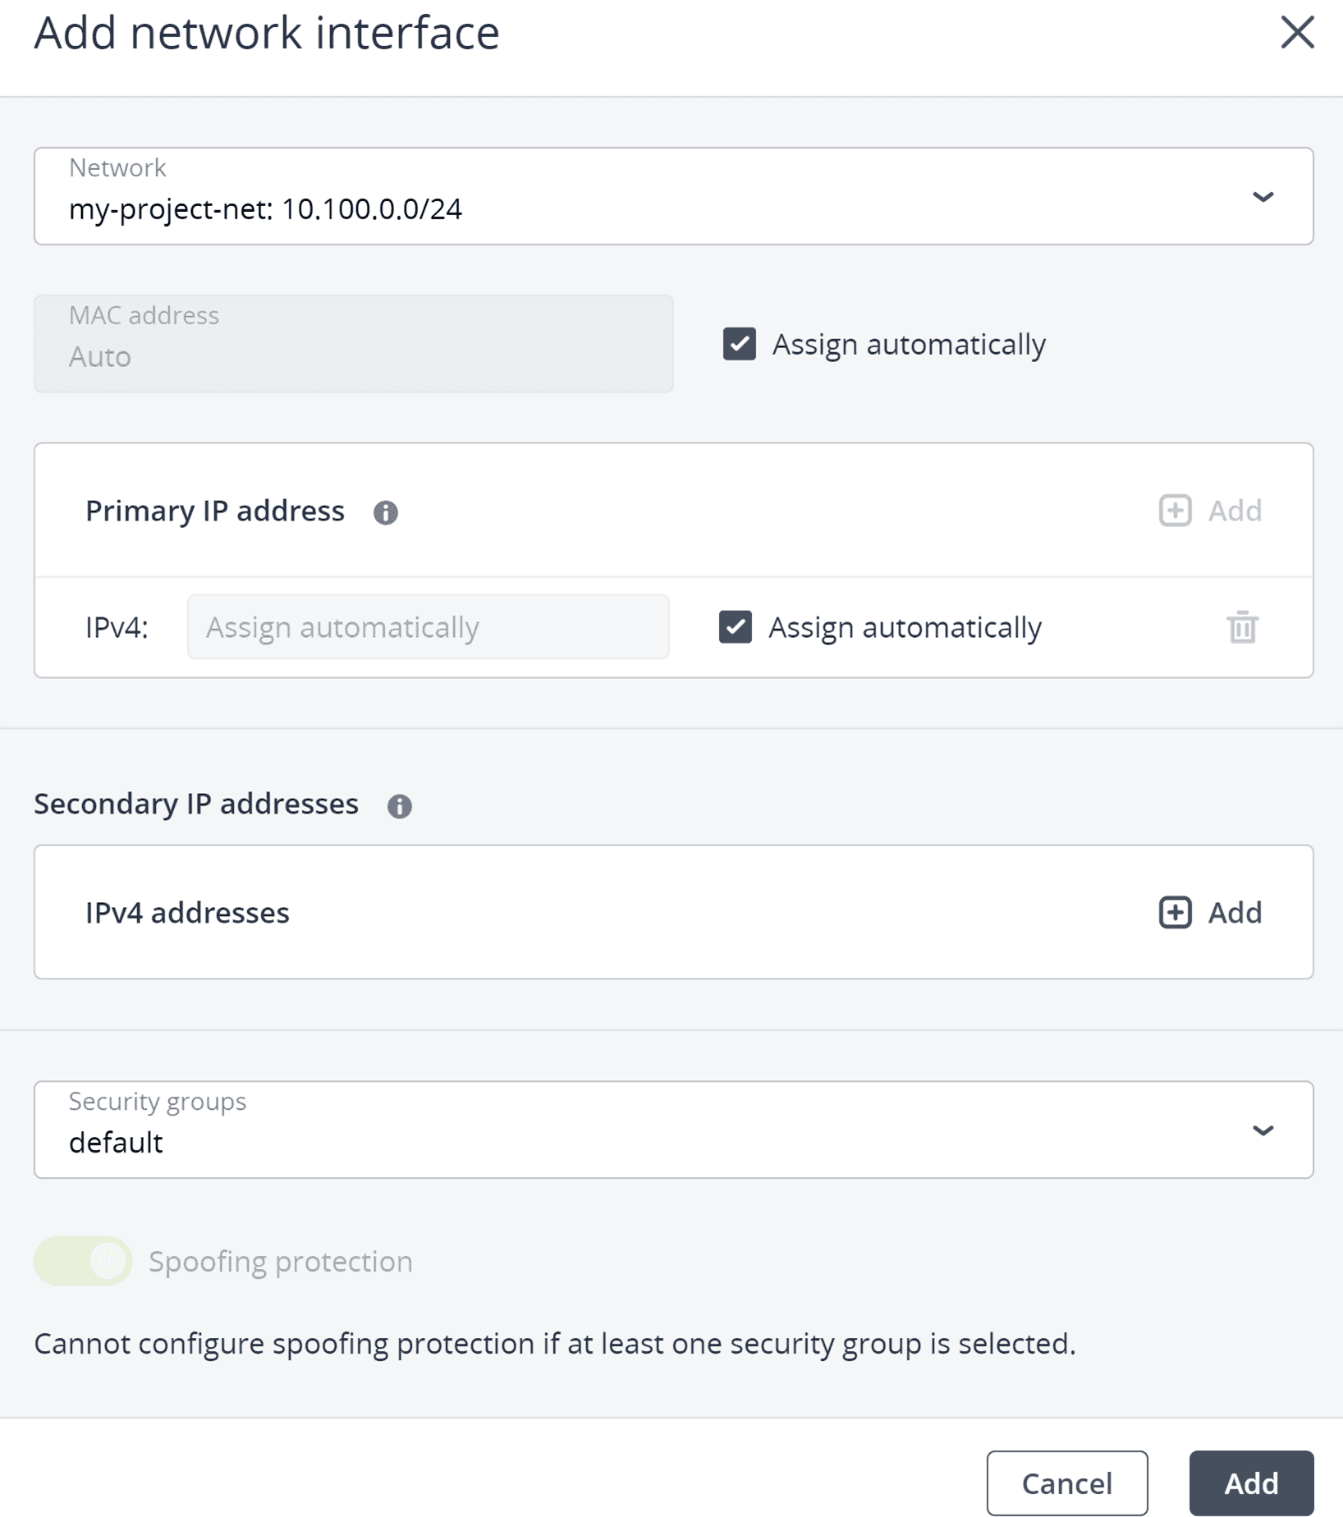
- In the Add network interface window, select a compute network to connect to, and then specify MAC address, IPv4 and/or IPv6 addresses, and security groups. By default, MAC and primary IP addresses are assigned automatically. To specify them manually, clear the Assign automatically check boxes, and enter the desired addresses. Optionally, assign additional IP addresses to the network interface in the Secondary IP addresses section. Note that a secondary IPv6 address is not available for an IPv6 subnet that works in the SLAAC or DHCPv6 stateless mode.
Note: Secondary IP addresses, unlike the primary one, will not be automatically assigned to the network interface inside the virtual machine guest OS. You should assign them manually.
- If you selected a virtual network with enabled IP address management: In this case, spoofing protection is enabled and the default security group is selected by default. This security group allows all incoming and outgoing traffic on all the VM ports. If required, you can select another security group or multiple security groups.To disable spoofing protection, clear all of the check boxes and turn off the toggle switch. Security groups cannot be configured with disabled spoofing protection.
- If you selected a virtual network with disabled IP address management: In this case, spoofing protection is disabled by default and cannot be enabled. Security groups cannot be configured for such a network.
- If you selected a shared physical network: In this case, spoofing protection cannot be configured by a self-service user. If you want to enable or disable spoofing protection, contact your system administrator.
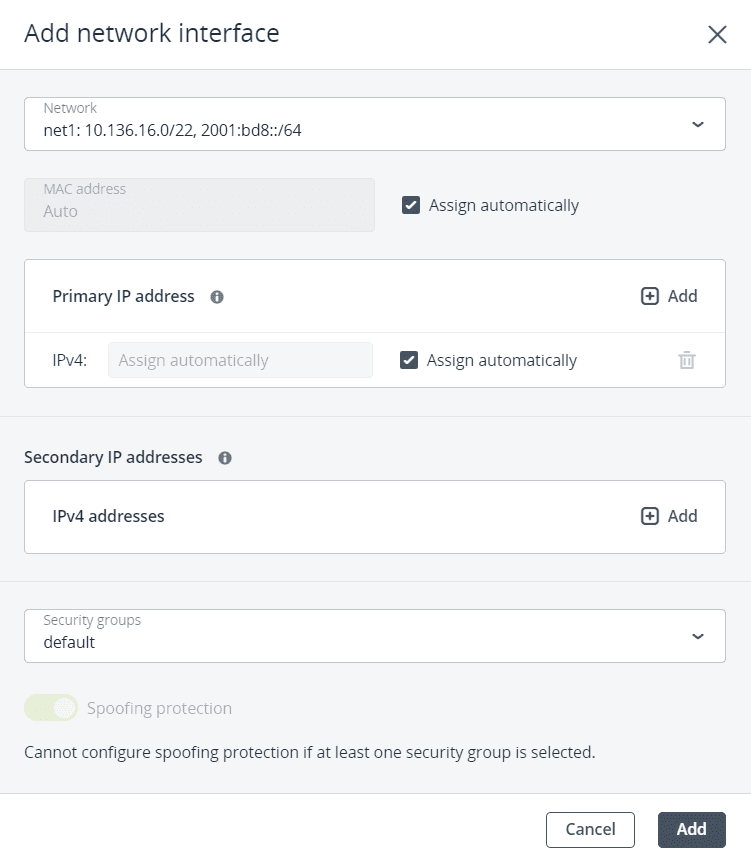
After specifying the network interface parameters, click Add. The network interface will appear in the Network interfaces list.
- [Optional] If required, edit IP addresses and security groups of newly added network interfaces. To do this, click the ellipsis icon, click Edit, and then set the parameters.
- When you finish configuring the VM network interfaces, click Done.
- [Optional] If you have chosen to boot from a template or volume, which has cloud-init and OpenSSH installed:
Important: As cloud images have no default password, you can access VMs deployed from them only by using the key authentication method with SSH.
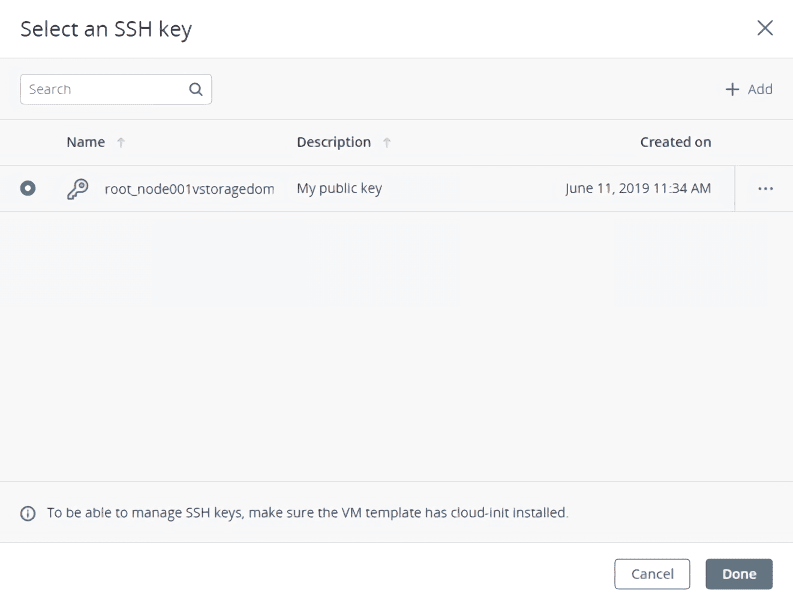
- Add an SSH key to the VM, to be able to access it via SSH without a password. In the Select an SSH key window, select an SSH key and then click Done.
- Add user data to customize the VM after launch, for example, change a user password. Write a cloud-config or shell script in the Customization script field or browse a file on your local server to load the script from.
 To inject a script in a Windows VM, refer to the Cloudbase-Init documentation. For example, you can set a new password for the account using the following script:
#ps1net user <username> <new_password>
[Optional] Enable CPU and RAM hot plug for the VM in Advanced options, to be able to change its flavor when the VM is running. You can also enable hot plug after the VM is created.
Note: If you do not see this option, CPU and RAM hot plug is disabled in your project. To enable it, contact your system administrator.
[Optional] If you have chosen to boot from an ISO image, enable UEFI boot in Advanced options, to be able to boot the VM in the UEFI mode. This option cannot be configured after the VM is created.
Note: You cannot configure UEFI boot if you have selected a template as the VM boot media. If your template has UEFI boot enabled, the option is automatically enabled for the VM, and vice versa.
- After configuring all of the VM parameters, click Deploy to create and boot the VM.
If you are deploying the VM from an ISO image, you need to install the guest OS inside the VM by using the built-in VNC console. For VMs with UEFI boot enabled, open the VNC console, and then press any key to boot from the chosen ISO image. Virtual machines created from a template or a boot volume already have a preinstalled guest OS.
Connecting to Virtual Machines
Cloudpe provides cloud images from OS vendors. By default, all cloud images have password login disabled in favor of key login.
Connecting to Virtual Machine via the VNC Console
Select a VM, and then click Console on its right pane. The console will open in a separate browser window. In the console, you can send a key combination to a VM, take a screenshot of the console window, and download the console log (refer to Troubleshooting Virtual Machines).
Connecting to Virtual Machine via SSH
Specify the username and VM IP address in the SSH terminal:
# ssh <username>@<VM_IP_address>
Linux cloud images have the default login, depending on the operating system, for example, centos or ubuntu. To connect to a Windows VM, enter the username that you specified during Cloudbase-Init installation.
If you have deployed a VM without specifying an SSH key, you also need to enter a password to log in to the VM.
Images and Cloud Usernames
Here is a list of images and cloud usernames:
| Name | Cloud username |
|---|---|
| AlmaLinux-9 | almalinux |
| AlmaLinux-8 | almalinux |
| CentOS-9 | centos |
| CentOS-8 | centos |
| CentOS-7 | centos |
| CentOS-6 | centos |
| cirros | cirros |
| Debian-10 | debian |
| Debian-9 | debian |
| RockyLinux-9 | rockylinux |
| RockyLinux-8 | rockylinux |
| Ubuntu-22.04 | ubuntu |
| Ubuntu-20.04 | ubuntu |
| Ubuntu-18.04 | ubuntu |
| Ubuntu-16.04 | ubuntu |
| Windows Server 2022 | Administrator |
| Windows Server 2019 | Administrator |
Note: Windows images do not have the SSH daemon installed. Set the administrator password on the first launch of the virtual machine.
Managing Virtual Machine Power State
Prerequisites:
- Virtual machines are created, as described in Creating Virtual Machines.
Managing the Power State of a Virtual Machine :
Click the virtual machine or the ellipsis button next to it to see the full list of actions available for the current state.
To restore a VM from the suspended state, click Resume.
To power up a VM, click Run.To gracefully shut down a running VM, click Shut down. The default shutdown timeout, after which a virtual machine will be powered off, is 10 minutes.
To forcibly cut off power from a VM, click Power off.
To softly reboot a running VM, click Reboot.
To reboot a VM without the guest OS graceful shutdown, click Hard reboot.
To save the current VM state to a file, click Suspend. This may prove useful, for example, if you need to restart the host but do not want to quit the applications currently running in the VM or restart its guest OS.
Reconfiguring Virtual Machines
Once you create a virtual machine, you can manage its CPU and RAM resources, as well as network interfaces and volumes.
Prerequisites:
Virtual machines are created, as described in Creating Virtual Machines.
Changing Virtual Machine Resources
You can change amount of CPU and RAM resources used by a virtual machine by applying another flavor to it. To be able to resize a running VM, you need to enable CPU and RAM hot plug for it first. You can change the hot plug settings for both new and existing VMs.
A running virtual machine has a resize limit, which defines the maximum number of vCPUs and the maximum amount of RAM you can allocate to the VM. The resize limit on vCPUs is static and equal to 64 for all VMs. The resize limit on RAM, on the contrary, is dynamic and depends on the amount of RAM a running VM is currently using. This limit is updated on a VM startup, and its values are listed in the table below.
| Current RAM size, in GiB | RAM size limit, in GiB |
|---|---|
| 1-4 | 16 |
| 5-8 | 32 |
| 9-16 | 64 |
| 17-32 | 128 |
| 33-64 | 256 |
| 65-128 | 512 |
| 129-256 | 1024 |
For example, you can resize a running VM with a flavor that has 16 GiB to a flavor with 256 GiB in two iterations:
- Resize the VM to a flavor with 64 GiB.
- Restart the VM to update the RAM size limit.
- Resize the VM to a flavor with 256 GiB.
Limitations:
- You cannot change the flavor for shelved VMs. To resize such a VM, unshelve it first.
- You cannot decrease the number of CPUs and the amount of RAM for running VMs.
- [For all Linux guests] If a VM has no guest tools installed, new cores may be offline after CPU hot plugging. You can verify which CPU cores are online by using the command:
# cat /sys/devices/system/cpu/online
To activate offline CPU cores, run:# echo 1 > /sys/devices/system/cpu/cpu<cpu_number>/online
Prerequisites: - Before changing a flavor, ensure that the node hosting the VM has at least as much free CPU and RAM resources as the new VM size. For example, to resize a VM to the large flavor, the host must have at least 4 vCPUs and 8 GiB of RAM free.
- CPU and RAM hot plug is enabled by the system administrator.
- Before resizing a running VM, ensure that the guest operating system supports CPU and RAM hot plug (refer to Supported Guest Operating Systems). Note that otherwise the guest operating system may become unstable after a resize. To increase CPU or RAM resources for such a guest operating system, you need to stop the virtual machine first.
- Before resizing a running VM, ensure that the guest operating system has the latest updates installed.
Enabling or Disabling CPU and RAM Hot Plug for Virtual Machine
- On the Virtual machines screen, ensure that the required virtual machine in the “Shut down” state, and then click it.
- On the Overview tab, click the pencil icon in the CPU and RAM hot plug field.
Note: If you do not see this field, CPU and RAM hot plug is disabled in your project. To enable it, contact your system administrator.
- Select or clear the Enable hot plug check box, and then click the tick icon to save the changes.
With CPU and RAM hot plug enabled, you can change the flavor of a running VM.
Changing Virtual Machine Flavor
- On the Virtual machines screen, click the required virtual machine.
- On the Overview tab, click the pencil icon in the Flavor field.
- In the Flavor window, select a new flavor, and then click Done.
Configuring Network Interfaces of Virtual Machines
You can add new network interfaces to your virtual machines, edit IP addresses and security groups for the existing interfaces, and remove network interfaces by detaching them.
Limitations:
- You cannot manage network interfaces of shelved VMs.
- A VM that is connected to a dual-stack network always receives an IPv6 address, if the IPv6 subnet is in the SLAAC or DHCPv6 stateless mode.
Connecting Virtual Machine to Private Network
- On the Virtual machines screen, click the required virtual machine.
- On the Overview tab, click Edit in the Network interfaces section.
- In the Network interfaces window, click Add to attach a network interface.
- In the Add network interface window:
- Select a compute network to connect to. By default, MAC and primary IP addresses are assigned automatically. To specify them manually, clear the Assign automatically checkboxes and ensure that free IP and MAC are selected.
- A secondary IP can be used by applications inside the VM.
Note: Cloudpe DHCP does not configure additional IP for an interface inside the VMs. Therefore any additional IP must be configured manually inside the VM guest.
A security group is a port firewall rules list; fault opens all connections. The default security group is selected by default. Create other rules on the Security group tab if required. Please refer to Managing Security Group Rules. - Spoofing protection is enabled by default. It is a security feature that blocks outgoing traffic with source MAC and IP addresses that differs from what was defined above. Disabling the spoofing protections also means disabling any firewall control. Do not disable the spoofing protection. If required, deselect the security group.
- Click Add.
- Click Done to finish editing VM network interfaces and save your changes.
- Select a compute network to connect to. By default, MAC and primary IP addresses are assigned automatically. To specify them manually, clear the Assign automatically checkboxes and ensure that free IP and MAC are selected.
Editing Network Interface of Virtual Machine
- On the Virtual machines screen, click the required virtual machine.
- On the Overview tab, click Edit in the Network interfaces section.
- In the Network interfaces window, click the ellipsis button next to the interface you want to edit, and then click Edit.
- In the Edit network interface window, modify the network interface parameters as follows:
- Change the primary IP address. To update the address inside the VM guest OS, restart the network interface.Add or remove secondary IP addresses.Modify security groups assigned to the VM.
- Click Done to finish editing VM network interfaces and save your changes.
Detaching Network Interface from Virtual Machine
- On the Virtual machines screen, click the required virtual machine.
- On the Overview tab, click Edit in the Network interfaces section.
- In the Network interfaces window, click the ellipsis button next to the interface you want to detach, and then click Remove.
- Click Done to finish editing VM network interfaces and save your changes.
Configuring Virtual Machine Volumes
You can add new volumes to your virtual machines, attach existing volumes, and detach unneeded volumes from virtual machines.
Limitations:
- You cannot change, detach, or delete the boot volume.
- You can only attach and detach non-boot volumes.
- You cannot manage volumes of shelved VMs.
Prerequisites:
To be able to use volumes attached to VMs, they must be initialized inside the guest OS by standard means.
Attaching Volume to Virtual Machine
- On the Virtual machines screen, click the required virtual machine.
- On the Overview tab, click the pencil icon in the Disks field.
- In the Volumes window:
- Click Attach to attach an existing volume, and then select the volume in the Attach volume window.
- Click Add to create a new volume, and then specify the volume name, size, and storage policy. The created volume will be automatically added to the VM disks.
- Click Attach to attach an existing volume, and then select the volume in the Attach volume window.
- Click Done to finish editing VM disks and save your changes.
Detaching Volume from Virtual Machine
- On the Virtual machines screen, click the required virtual machine.
- On the Overview tab, click the pencil icon in the Disks field.
- In the Volumes window:
- Click Detach to detach a volume from a stopped virtual machine.
- Click Force detach to detach a volume from a running virtual machine.
- Click Detach to detach a volume from a stopped virtual machine.
Note: There is a risk of data loss.
4) Click Done to finish editing VM disks and save your changes.
Monitoring Virtual Machines
Prerequisites:
- Virtual machines are created, as described in Creating Virtual Machines.
Monitoring Virtual Machine’s CPU, Storage, and Network Usage
Select the VM and open the Monitoring tab.
The default time interval for the charts is twelve hours. To zoom into a particular time interval, select the internal with the mouse; to reset zoom, double-click any chart.
The following performance charts are available:
CPU / RAM
CPU and RAM usage by the VM.
Network
Incoming and outgoing network traffic.
Storage read/write
Amount of data read and written by the VM.
Read/write latency
Read and write latency. Hovering the mouse cursor over a point on the chart, you can also see the average and maximum latency for that moment, as well as the 95 and 99 percentiles.
Note: Averaged values are calculated every five minutes.
Shelving Virtual Machines
You can unbind a stopped VM from the node it is hosted on and release its reserved resources such as CPU and RAM. A shelved VM remains bootable and retains its configuration, including the IP addresses.
Prerequisites:
Virtual machines are created, as described in Creating Virtual Machines.
Shelving Virtual Machine
- Click the desired virtual machine.
- If the VM is stopped, click Shelve on its right pane.
- If the VM is running or suspended, click Shut down or Power off on its right pane, and then select Shelve virtual machine in the confirmation window.
Spawning Shelved VM on Node with Enough Resources to Host It
- Click a shelved virtual machine.
- On the VM right pane, click Unshelve.
Rescuing Virtual Machines
If a VM experiences boot problems, you can send it to the rescue mode to access its boot volume. When a VM in the “Active” state is sent to the rescue mode, it is shut down softly first. Once the VM is in the rescue mode, you can connect to it via SSH or via the console. Its previous boot disk is now attached as a secondary one. You can mount the disk and repair it.
Limitations:
- You can send a VM to the rescue mode only if its current status is “Active” or “Shut down”.
- There are only three actions available for the VM in the rescue mode: Console, Exit rescue mode, and Delete.
- If a rescue image has cloud-init installed, then the VM booted from it can be accessed with the same SSH key that was used for its creation.
Prerequisites:
- Virtual machines are created, as described in Creating Virtual Machines.
Putting Virtual Machine to the Rescue Mode
- On the Virtual machines screen, click the required VM on the list.
- On the VM right pane, click the ellipsis button on the toolbar. Then, click Enter rescue mode.
- In the Enter rescue mode window, select an image to rescue the VM with. By default, the initial image used for creating the VM is selected. Click Enter.
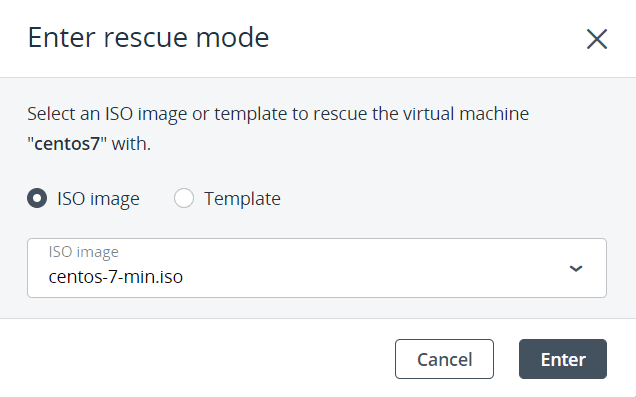
The machine status changes to “Rescue”.
Returning Virtual Machine to Normal Operation
- On the Virtual machines screen, click the required VM on the list.
- On the VM right pane, click Exit rescue mode.
- In the Exit rescue mode window, click Exit. The VM will be automatically rebooted.
The VM status changes to “Active” and it boots from the original root disk.
Note: If the VM status changes to “Error” when exiting the rescue mode, you can reset its status with the Reset state action. The VM should then return to the “Rescue” status again.
Exiting the Rescue Mode for Windows VM
There might be an issue of exiting the rescue mode for a Windows VM. If in the rescue mode you set the original system disk online, its ID becomes the same as that of the rescue disk. Then, when you try to exit the rescue mode, the boot loader cannot find the proper boot disk. To resolve the ID conflict, follow the steps:
- With the VM in the rescue mode, open the Disk Management window and note the numbers of the original system disk (offline) and the rescue disk (online). Set the original system disk to Online.
- To edit the boot configuration, enter the following command in the Command Prompt window:
> bcdedit /store <the original system disk name>:\boot\bcd
3) Review the output and check that the rescue disk is the target for objects in the output
(partition=<the rescue disk name>).
If the objects do not point to drive C, fix it with the following commands:
> bcdedit /store <the original system disk name>:\boot\bcd \
/set {default} osdevice partition=<the rescue disk name>:
> bcdedit /store <the original system disk name>:\boot\bcd \
/set {default} device partition=<the rescue disk name>:
> bcdedit /store <the original system disk name>:\boot\bcd \
/set {bootmgr} device partition=<the rescue disk name>:
> bcdedit /store <the original system disk name>:\boot\bcd \
/set {memdiag} device partition=<the rescue disk name>:
4) To view the available disks, enter the following commands in the command line:
> DISKPART
> LIST DISK
Match the disk number and name to those displayed in the Disk Management window.
5) To get the ID of the rescue disk, run the following commands:

> SELECT DISK <the rescue disk number>
> UNIQUEID DISK

Record the disk ID, you will need it later.
6) Change this ID by using the following command:
> UNIQUEID DISK id=<any hex value of 8 characters>
Make sure that the value has changed with the UNIQUEID DISK command.
7) Assign the ID that you recorded previusly to the original system disk:
> SELECT DISK <the original system disk number>
> UNIQUEID DISK id=<the recorded disk ID>
Make sure that the value has changed with the UNIQUEID DISK command.
You should now be able to exit the rescue mode.
Troubleshooting Virtual Machines
If a virtual machine fails to deploy, review the error message on the VM right pane. One of the possible root causes is that compute nodes lack free RAM or CPU resources to host the VM.
If a virtual machine is in the error state, examine the VM history in the History tab on the VM right pane. The event log will contain all of the VM management operations performed by users in the user or command-line interface. You can expand each log entry to view operation details by clicking the arrow icon next to it. The details include the operation name, date and time, status, initiator, and request ID.
If a virtual machine is stuck in a failed or transitional state, reset the VM to its last stable state (active, shut down or shelved):
- Click the stuck VM.
- On the VM right pane, click Reset state.
If a virtual machine fails to boot, examine the VM console log by clicking Download console log on the VM right pane.
Deleting Virtual Machines
Limitations:
- A VM is removed along with its disks that have the Delete on termination option enabled during the VM deployment.
Prerequisites:
- Virtual machines are created, as described in Creating Virtual Machines.
Removing One Virtual Machine
- Click the ellipsis button next to a VM you want to delete, and then click Delete.
- Click Delete in the confirmation window.
Removing Multiple Virtual Machines
- Select the check boxes next to VMs you want to delete.
- Over the VM list, click Delete.
- Click Delete in the confirmation window.