Managing Kubernetes Clusters

Self-service users can deploy ready-to-use Kubernetes clusters with persistent storage for managing containerized applications.

A Kubernetes cluster includes the following components:

Kubernetes versionUnderlying OSContainer runtimeNetwork plugin
v1.21.3, v1.22.2Fedora 36 CoreOSDocker 20.10.12Flannel with VXLAN
v1.23.5, v1.24.3containerd 1.6.6

Limitations:

  • Kubernetes versions 1.15.x-1.20.x are not generally upheld. Kubernetes clusters made with these forms are set apart with the Deprecated tag.
  • Kubernetes cluster authentications are given for quite some time. To restore the declarations, use the openstack coe ca rotate command, as described in the OpenStack documentation.


Creating and Deleting Kubernetes Clusters

Limitations:

  • Only users that have access to the corresponding project can perform operations with Kubernetes clusters.

Requirements:

  • The Kubernetes-as-a-service component is installed by a system administrator. It can be deployed along with the compute cluster or later.
  • You have a network that will interconnect the Kubernetes master and worker nodes. It can be either a shared physical network or a virtual network linked to a physical one via a virtual router. The virtual network needs to have a gateway and a DNS server specified.
  • An SSH key is added. It will be installed on both the master and worker nodes.
  • You have enough resources for all of the Kubernetes nodes, taking their flavors into account.
  • It is also required that the network where you create a Kubernetes cluster does not overlap with these default networks:
    • 10.100.0.0/24—Used for pod-level networking
    • 10.254.0.0/16—Used for allocating Kubernetes cluster IP addresses

 Creating Kubernetes Cluster

  1. Go to the Kubernetes clusters screen, and then click Create on the right. A window will open where you can set your cluster parameters.
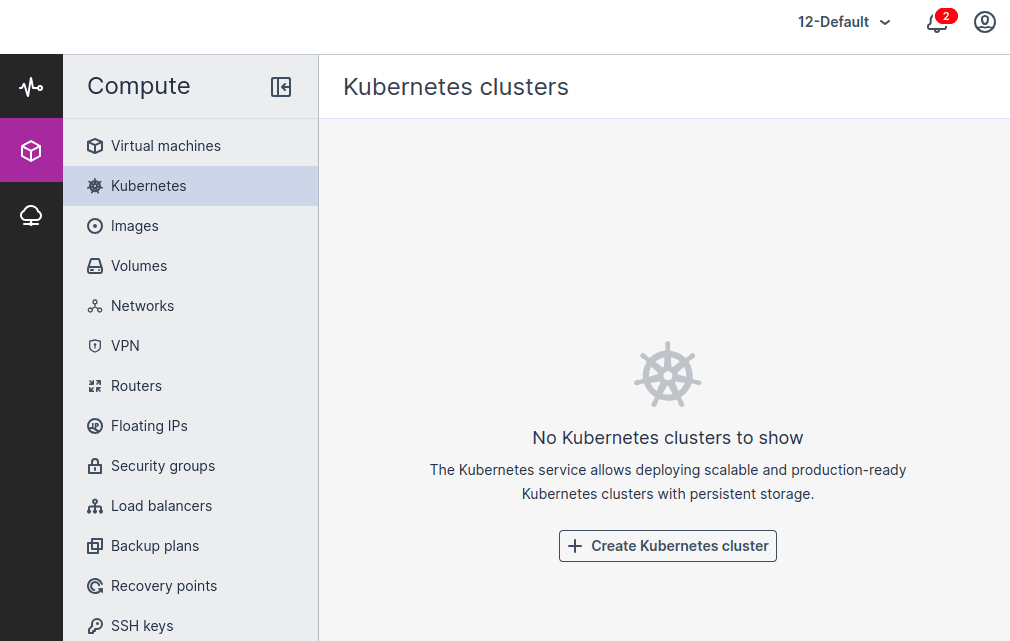
  2. Enter the cluster name, and then select a Kubernetes version and an SSH key.
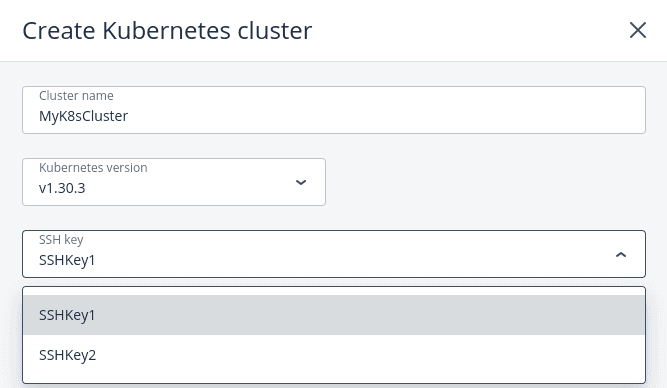
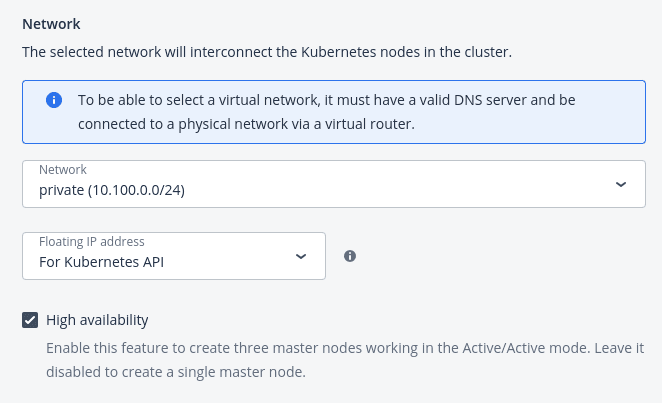
  3. In the Network section, select a network that will interconnect the Kubernetes nodes in the cluster. If you select a virtual network, decide whether you need access to your Kubernetes cluster via a floating IP address:
    • If you select None, you will not have access to the Kubernetes API.If you select For Kubernetes API, a floating IP address will be assigned to the master node or to the load balancer if the master node is highly available.If you select For Kubernetes API and nodes, floating IP addresses will be additionally assigned to all of the Kubernetes nodes (masters and workers).
    Then, choose whether or not to enable High availability for the master node. If you enable high availability, three master node instances will be created. They will work in the Active/Active mode.


  4. In the Master Node section, select a flavor for the master node. For production clusters, it is strongly recommended to use a flavor with at least 2 vCPUs and 8 GiB of RAM.
  5. Optionally, enable Integrated monitoring to automatically deploy the cluster-wide monitoring solution, which includes the following components: Prometheus, Alertmanager, and Grafana.This feature is experimental and not supported in production environments.
  6. In the Container volume section, select a storage policy, and then enter the size for volumes on both master and worker nodes.
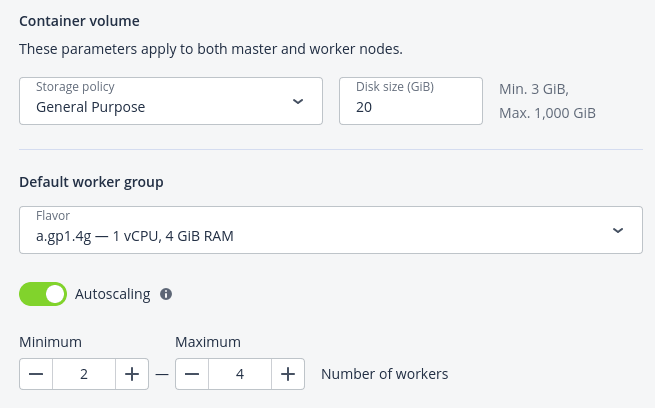
  7. In the Default worker group section, select a flavor for each worker, and then decide whether you want to allow automatic scaling of the worker group:
    • With Autoscaling enabled, the number of workers will be automatically increased if there are pods stuck in the pending state due to insufficient resources, and reduced if there are workers with no pods running on them. For scaling of the worker group, set its minimum and maximum size.
    • With Autoscaling disabled, the number of worker nodes that you set will be permanent.

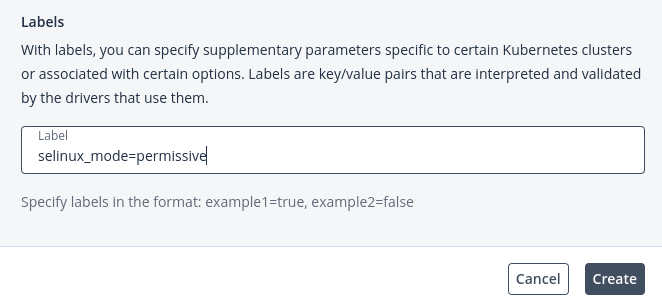
  8. In the Labels section, enter labels that will be used to specify supplementary parameters for this Kubernetes cluster in the key=value format. For example: selinux_mode=permissive. Currently, only the selinux label is supported. You can use other labels at your own risk.
  9. Click Create.

Creation of the Kubernetes cluster will start. The master and worker nodes will appear on the Virtual machines screen, while their volumes will show up on the Volumes screen.

After the cluster is ready, click Kubernetes access for instructions on how you can access the dashboard. You can also access the Kubernetes master and worker nodes via SSH, by using the assigned SSH key and the user name core.
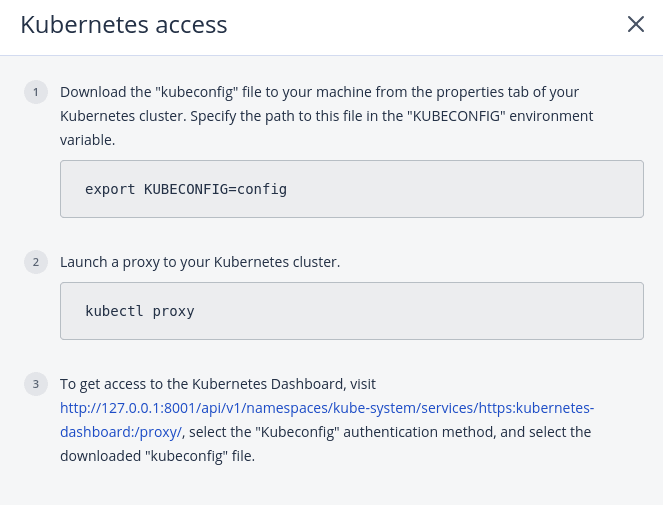
Deleting Kubernetes Cluster

Click the required Kubernetes cluster on the Kubernetes clusters screen and click Delete. The master and worker VMs will be deleted along with their volumes

Managing Kubernetes Worker Groups


To meet the system requirements of applications running in Kubernetes clusters, you can have worker nodes with different numbers of CPUs and amount of RAM. Creating workers with different flavors is possible by using worker groups.

When creating a Kubernetes cluster, you can specify the configuration of only one worker group, the default worker group. After the cluster is created, add as many worker groups as you need. If required, you can also edit the number of workers in a group later.

Limitations:

  • Worker groups are not available for Kubernetes version 1.15.x.
  • The default worker group cannot be deleted.

Requirements:

A Kubernetes cluster is created, as described in Creating and Deleting Kubernetes Clusters.

Adding Worker Group

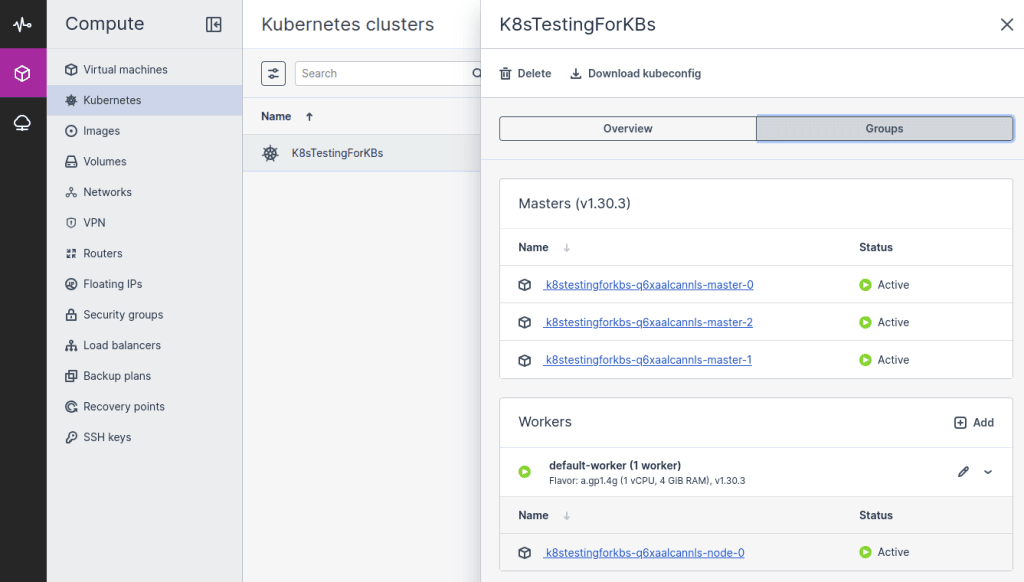
  1. On the Kubernetes clusters screen, click a Kubernetes cluster.
  2. On the cluster right pane, navigate to the Groups tab.
  3. In the Workers section, click Add.
  4. In the Add worker group window, specify a name for the group.
  5. In the Worker group section, select a flavor for each worker, and then decide whether you want to allow automatic scaling of the worker group:
    • With Autoscaling enabled, the number of workers will be automatically increased if there are pods stuck in the pending state due to insufficient resources, and reduced if there are workers with no pods running on them. For scaling of the worker group, set its minimum and maximum size.
    • With Autoscaling disabled, the number of worker nodes that you set will be permanent.
  6. In the Labels section, enter labels that will be used to specify supplementary parameters for this Kubernetes cluster in the key=value format. For example: selinux_mode=permissive. Currently, only the selinux label is supported. You can use other labels at your own risk. To see the full list of supported labels, refer to the OpenStack documentation.
  7. Click Add.

    kubernetes-clusters

When the worker group is created, you can assign pods to these worker nodes, as explained in Assigning Kubernetes Pods to Specific Nodes.

Editing the Number of Workers in Group

  1. On the Kubernetes cluster right pane, navigate to the Groups tab.
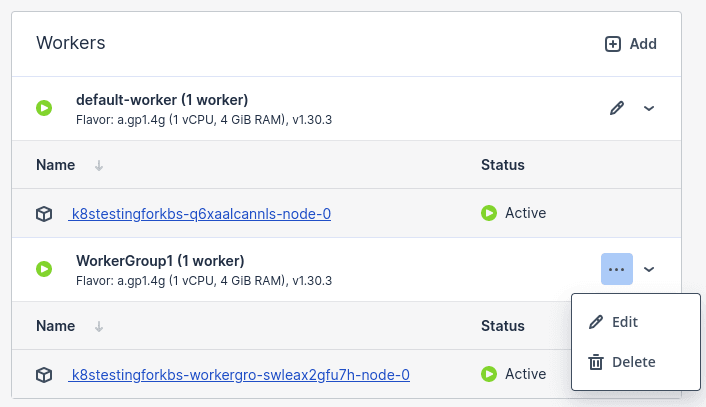
  2. In the Workers section, click the pencil icon for the default worker group or the ellipsis icon for all other groups, and then select Edit.
  3. In the Edit workers window, enable or disable Autoscaling, or change the number of workers in the group.
  4. Click Save.

Deleting Worker Group

Click the ellipsis icon next to the required worker group, and then select Delete. The worker group will be deleted along with all of its workers. After the deletion, the worker group data will be lost.
Updating Kubernetes Clusters

When another Kubernetes version opens up, you can refresh your Kubernetes bunch to it. An update is non-problematic for Kubernetes worker nodes hubs, and that implies that these hubs are refreshed individually, with the information accessibility unaffected. The Kubernetes Programming interface will be inaccessible during an update, except if high accessibility is empowered for the expert hub.

Limitations:

  • You can’t refresh Kubernetes clusters with version 1.15.x to fresher forms.
  • You can’t marge Kubernetes clusters in the self-service panel during an update.

Requirements:

  • A Kubernetes clusters is made, as described in Making and Erasing Kubernetes Clusters.

Updating Kubernetes Cluster

  1. Click a Kubernetes cluster that is marked with the Update available tag.
  2. On the Kubernetes cluster pane, click Update in the Kubernetes version field.
  3. In the Update window, select a Kubernetes version to update to and follow the provided link to read about API resources that are deprecated or obsoleted in the selected version. Then, click Update.
  4. In the confirmation window, click Confirm. The update process will start.

Note:-

Do not manage Kubernetes virtual machines during the update as it may lead to disruption of the update process and cluster inoperability.

Using Persistent Volumes for Kubernetes Pods

Kubernetes allows using compute volumes as persistent storage for pods. Persistent volumes (PV) exist independently of pods, meaning that such a volume persists after the pod it is mounted to is deleted. This PV can be mounted to other pods for accessing data stored on it. You can provision PVs dynamically, without having to create them manually, or statically, using volumes that exist in the compute cluster.

Creating Storage Classes

In Cloudpe, storage classes map to compute storage policies defined in the admin panel. Creating a storage class is required for all storage operations in a Kubernetes cluster.

Creating Storage Class

Сlick + Create on the Kubernetes dashboard and specify a YAML file that defines this object. For example:

apiVersion: storage.k8s.io/v1
kind: StorageClass
metadata:
  name: mysc
provisioner: cinder.csi.openstack.org
parameters:
  type: default

This manifest describes the storage class mysc with the storage policy default. The storage policy must exist in the compute cluster and be specified in the storage quotas to the current project.

Dynamically Provisioning Persistent Volumes

Persistent volumes can be dynamically provisioned via persistent volume claims (PVC). A PVC requests for a PV of a specific storage class, access mode, and size. If a suitable PV exists in the cluster, it is bound to the claim. If suitable PVs do not exist but can be provisioned, a new volume is created and bound to the claim. Kubernetes uses a PVC to obtain the PV backing it and mounts it to the pod.

Prerequisites:

  • A pod and the persistent volume claim it uses must exist in the same namespace.

Provisioning PV to Pod Dynamically

  1. Access the Kubernetes cluster via the dashboard. Click Kubernetes access for instructions.
  2. On the Kubernetes dashboard, create a storage class, as described in Creating Storage Classes.
  3. Create a persistent volume claim. To do it, click + Create and specify the following YAML file:apiVersion: v1 kind: PersistentVolumeClaim metadata: name: mypvc spec: accessModes: – ReadWriteOnce resources: requests: storage: 10Gi storageClassName: mysc This manifest specifies the persistent volume claim mypvc that requests from the storage class mysc a volume of at least 10 GiB that can be mounted in the read/write mode by a single node.Creation of the PVC triggers dynamic provisioning of a persistent volume that satisfies the claim’s requirements. Kubernetes then binds it to the claim.
    Kubernetes-clusters
  4. Create a pod and specify the PVC as its volume. To do it, click + Create and enter the following YAML file:apiVersion: v1 kind: Pod metadata: name: nginx spec: containers: – image: nginx imagePullPolicy: IfNotPresent name: nginx ports: – containerPort: 80 protocol: TCP volumeMounts: – mountPath: /var/lib/www/html name: mydisk volumes: – name: mydisk persistentVolumeClaim: claimName: mypvc readOnly: false

This configuration file describes the pod nginx that uses the persistent volume claim mypvc. The persistent volume bound to the claim will be accessible at /var/lib/www/html inside the nginx container.

Statically Provisioning Persistent Volumes

You can mount existing compute volumes to pods using static provisioning of persistent volumes.

Mounting Compute Volume

  1. In the self-service panel, obtain the ID of the desired volume.

    kubernetes-clusters
  2. Access the Kubernetes cluster via the dashboard. Click Kubernetes access for instructions.
  3. On the Kubernetes dashboard, create a storage class, as described in Creating Storage Classes.
  4. Create a persistent volume. To do it, click + Create and specify the following YAML file:apiVersion: v1 kind: PersistentVolume metadata: annotations: pv.kubernetes.io/provisioned-by: cinder.csi.openstack.org name: mypv spec: accessModes: – ReadWriteOnce capacity: storage: 10Gi csi: driver: cinder.csi.openstack.org fsType: ext4 volumeHandle: c5850e42-4f9d-42b5-9bee-8809dedae424 persistentVolumeReclaimPolicy: Delete storageClassName: mysc This manifest specifies the persistent volume mypv from the storage class mysc that has 10 GiB of storage and access mode that allows it to be mounted in the read/write mode by a single node. The PV mypv uses the compute volume with the ID c5850e42-4f9d-42b5-9bee-8809dedae424 as backing storage.
  5. Create a persistent volume claim. Before you define the PVC, make sure the PV is created and has the status “Available”. The existing PV must meet the claim’s requirements to storage size, access mode and storage class. Click + Create and specify the following YAML file:apiVersion: v1 kind: PersistentVolumeClaim metadata: name: mypvc spec: accessModes: – ReadWriteOnce resources: requests: storage: 10Gi storageClassName: mysc Once the persistent volume claim mypvc is created, the volume mypv is bound to it.

    kubernetes-clusters
  6. Create a pod and specify the PVC as its volume. Use the example from Step 4 in Dynamically Provisioning Persistent Volumes.In the self-service panel, the compute volume will be mounted to the virtual machine running the Kubernetes pod.../_images/vhc-statically-provisioning-persistent-volumes-3.png

Making Kubernetes Deployments Highly Available

If a node that hosts a Kubernetes pod fails or becomes unreachable over the network, the pod is stuck in a transitional state. In this case, the pod’s persistent volumes are not automatically detached, and it prevents the pod redeployment on another worker node. To make your Kubernetes applications highly available, you need to enforce the pod termination in the event of node failure by adding rules to the pod deployment.

Terminating Stuck Pod

Add the following lines to the spec section of the deployment configuration file:

terminationGracePeriodSeconds: 0
tolerations:
- effect: NoExecute
key: node.kubernetes.io/unreachable
operator: Exists
tolerationSeconds: 2
- effect: NoExecute
key: node.kubernetes.io/not-ready
operator: Exists
tolerationSeconds: 2

If the node’s state changes to “NotReady” or “Unreachable”, the pod will be automatically terminated in 2 seconds.

The entire YAML file of a deployment may look as follows:

apiVersion: apps/v1
kind: Deployment
metadata:
  name: nginx
spec:
  replicas: 1
  selector:
    matchLabels:
      app: nginx
  template:
    metadata:
      labels:
        app: nginx
    spec:
      terminationGracePeriodSeconds: 0
      tolerations:
      - effect: NoExecute
        key: node.kubernetes.io/unreachable
        operator: Exists
        tolerationSeconds: 2
      - effect: NoExecute
        key: node.kubernetes.io/not-ready
        operator: Exists
        tolerationSeconds: 2
      containers:
      - image: nginx
        imagePullPolicy: IfNotPresent
        name: nginx
        ports:
        - containerPort: 80
          protocol: TCP
        volumeMounts:
          - mountPath: /var/lib/www/html
            name: mydisk
      volumes:
        - name: mydisk
          persistentVolumeClaim:
            claimName: mypvc

The manifest above describes the deployment nginx with one pod that uses the persistent volume claim mypvc and will be automatically terminated in 2 seconds in the event of node failure.

Creating External Load Balancers in Kubernetes

In Kubernetes, you can create a service with an external load balancer that provides access to it from public networks. The load balancer will receive a publicly accessible IP address and route incoming requests to the correct port on the Kubernetes cluster nodes.

Requirements:

  • To be able to assign a specific floating IP address to an external load balancer during its deployment, this floating IP address must be created in advance, as described in Managing Floating IP Addresses.

Creating Service with External Load Balancer

  1. Access the Kubernetes cluster via the dashboard. Click Kubernetes access for instructions.
  2. On the Kubernetes dashboard, create a deployment and service of the LoadBalancer type. To do it, click + Create and specify a YAML file that defines these objects. For example:
    • If you have deployed the Kubernetes cluster in a shared physical network, specify the following manifest:apiVersion: apps/v1 kind: Deployment metadata: name: nginx spec: replicas: 2 selector: matchLabels: app: nginx template: metadata: labels: app: nginx spec: containers: – name: nginx image: nginx ports: – containerPort: 80 — kind: Service apiVersion: v1 metadata: name: load-balancer annotations: service.beta.kubernetes.io/openstack-internal-load-balancer: “true” spec: selector: app: nginx type: LoadBalancer ports: – port: 80 targetPort: 80 protocol: TCP The manifest above describes the deployment nginx with a replica set of two pods and the service load-balancer with the LoadBalancer type. The annotation used for the service indicates that the load balancer will be internal.Once the load balancer is created, it will be allocated an IP address from the shared physical network and can be accessed at this external endpoint.


    kubernetes-clusters
    • If you have deployed the Kubernetes cluster in a virtual network linked to a physical one via a virtual router, you can use the YAML file above without the annotations section for the load-balancer service. The created load balancer will receive a floating IP address from the physical network and can be accessed at this external endpoint. To use a specific floating IP address, create it in the self-service panel in advance, and then specify it with the loadBalancerIP parameter:<…> — kind: Service apiVersion: v1 metadata: name: load-balancer spec: selector: app: nginx type: LoadBalancer loadBalancerIP: 10.10.10.100 ports: – port: 80 targetPort: 80 protocol: TCPIf you want to choose whether to create highly available load balancers for your service or not, you can make use of load balancer flavors. To specify a flavor for a load balancer add loadbalancer.openstack.org/flavor-id: <flavor-id> to the annotations section. The flavor ID can be obtained from your system administrator.
    The load balancer will also appear in the self-service panel, where you can monitor its performance and health. For example:

    kubernetes-clusters

Assigning Kubernetes Pods to Specific Nodes

By using worker groups, you can assign a pod in Kubernetes to specific nodes. When you create a custom worker group, its nodes are added a label with the group name. If you want your pod to be scheduled on a node from a specific worker group, add the node selector section with the node label to the pod’s configuration file.

Creating Pod That Will Be Scheduled on Specific Node

Click + Create on the Kubernetes dashboard and specify a YAML file that defines this object. For example:

apiVersion: v1
kind: Pod
metadata:
  name: nginx
  labels:
    env: test
spec:
  containers:
  - name: nginx
    image: nginx
    imagePullPolicy: IfNotPresent
  nodeSelector:
    magnum.openstack.org/nodegroup: mygroup

This manifest describes the pod nginx that will be assigned to a node from the node group mygroup.

When the pod is created, check that the hosting node belongs to the specified worker group.

Monitoring Kubernetes Clusters

Note:-

This feature is experimental and not supported in production environments.

If you have enabled integrated monitoring during your Kubernetes cluster deployment, that means that the cluster has the monitoring_enabled=true label and the following components installed:

  • Prometheus for data collection, storage, and search:
    • node-exporter exposes various server-level and OS-level metrics.
    • kube-state-metrics generates metrics on the state of Kubernetes objects.
  • Alertmanager for alarm aggregation, processing, and dispatch.
  • Grafana server for metrics visualization.

For instructions on how to create and configure Alertmanager and Prometheus instances, refer to the kube-prometheus documentation.

The Grafana server is accessible from within a Kubernetes cluster at the magnum-grafana.kube-system.svc.cluster.local DNS name and TCP port 80.

The metrics on the state of Kubernetes objects are exported at the /metrics HTTP endpoint on the listening port: magnum-kube-state-metrics.kube-system.svc.cluster.local:8080/metrics. The metrics can be consumed either by Prometheus itself or by a scraper that is able to scrape a Prometheus client endpoint. For the list of exposed metrics, refer to kube-state-metrics documentation.

Prerequisites:

  • A Kubernetes cluster with enabled integrated monitoring is created, as described in Creating and Deleting Kubernetes Clusters.

Accessing the Kubernetes Grafana Dashboards

  1. On the Kubernetes clusters screen, click a Kubernetes cluster.
  2. On the cluster right pane, click Download kubeconfig. The .kubeconfig file will be downloaded to your client machine.
  3. On your client machine, install and set up the kubectl tool, to be able to run commands against Kubernetes clusters, as described in the official documentation.
  4. Specify the path to your Kubernetes configuration file in the KUBECONFIG environment variable:# export KUBECONFIG=<path_to_kubeconfig>
  5. Check that the kube-prometheus stack is installed:# kubectl –namespace kube-system get pods -l “release=magnum” NAME READY STATUS RESTARTS AGE magnum-kube-prometheus-sta-operator-85f757c5dc-ckllb 1/1 Running 0 3d17h magnum-kube-state-metrics-5cc46cbc5f-tclcv 1/1 Running 0 3d17h magnum-prometheus-node-exporter-99kfc 1/1 Running 0 3d3h magnum-prometheus-node-exporter-gwgzr 1/1 Running 0 3d17h magnum-prometheus-node-exporter-q2pm2 1/1 Running 0 3d17h magnum-prometheus-node-exporter-sqsl7 1/1 Running 0 2d22h
  6. Obtain the password of the admin user:# kubectl get secret –namespace kube-system magnum-grafana \ -o jsonpath=”{.data.admin-password}” | base64 –decode ; echo
  7. Configure the port forwarding for the Grafana pod:# kubectl –namespace kube-system port-forward service/magnum-grafana 3000:80
  8. Log in to http://localhost:3000 under the admin user by specifying its username and password obtained in step 6.
  9. In the left menu, click Dashboards > Browse, and then select the dashboard you want to view.

    kubernetes-clusters

Accessing the Prometheus User Interface

  1. On the Kubernetes clusters screen, click a Kubernetes cluster.
  2. On the cluster right pane, click Download kubeconfig. The .kubeconfig file will be downloaded to your client machine.
  3. On your client machine, install and set up the kubectl tool, to be able to run commands against Kubernetes clusters, as described in the official documentation.
  4. Specify the path to your Kubernetes configuration file in the KUBECONFIG environment variable:# export KUBECONFIG=<path_to_kubeconfig>
  5. Configure the port forwarding for the Prometheus pod:# kubectl –namespace kube-system port-forward service/magnum-kube-prometheus-sta-prometheus 9090
  6. Visit http://localhost:9090/graph to use the Prometheus expression browser and to graph expressions. You can also navigate to http://localhost:9090/metrics to view the list of exported metrics, or http://localhost:9090/alerts to view the alerting rules.

    kubernetes-clusters

Accessing the Alertmanager User Interface

  1. On the Kubernetes clusters screen, click a Kubernetes cluster.
  2. On the cluster right pane, click Download kubeconfig. The .kubeconfig file will be downloaded to your client machine.
  3. On your client machine, install and set up the kubectl tool, to be able to run commands against Kubernetes clusters, as described in the official documentation.
  4. Specify the path to your Kubernetes configuration file in the KUBECONFIG environment variable:# export KUBECONFIG=<path_to_kubeconfig>
  5. Configure the port forwarding for the Alertmanager pod:# kubectl –namespace kube-system port-forward service/magnum-kube-prometheus-sta-alertmanager 9093
  6. Visit http://localhost:9093 to access the Alertmanager user interface.

    kubernetes-clusters
Was this article helpful?

Related Articles