Load balancing improves the performance and reliability of web applications by sharing incoming traffic across multiple virtual machines (VMs) in a group.
The load balancer takes incoming requests and sends them to the best available VM, using a set of rules called a balancing algorithm and checking the health of each VM. This ensures your application runs smoothly and stays online even if some VMs face issues.
Creating load balancers
A network where a load balancer will operate has IP management enabled. All VMs that will be added in balancing pools have fixed IP addresses. The forwarding rule and protocol cannot be changed after the load balancer pool is added.
To create a load balancer with balancing pools
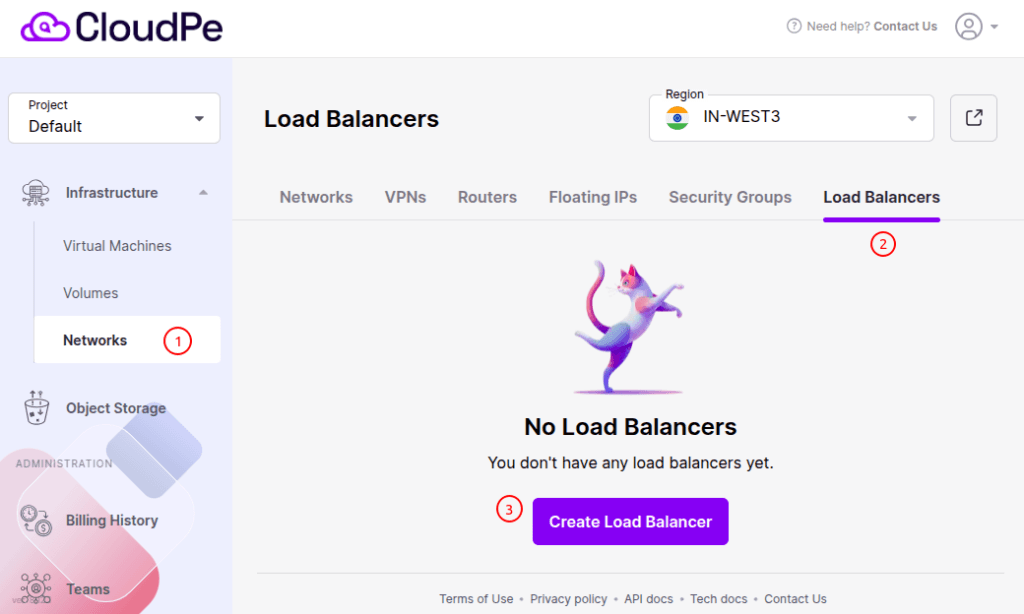
1. Go to the Load Balancers Screen. Click Create Load Balancer to start.
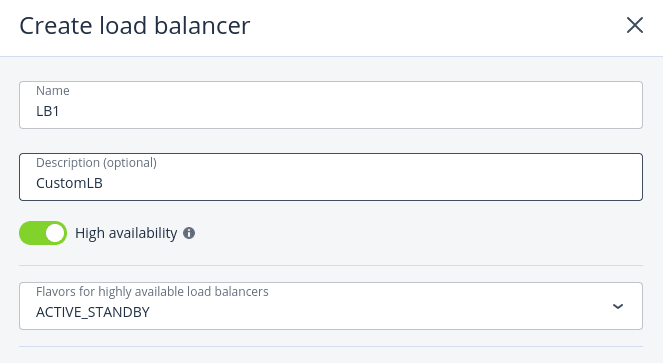
2. Give your load balancer a Name and, optionally, a Description.
3. High Availability (Optional)
- Enable High Availability: Creates two instances (will work in Active/Standby mode) that automatically switch if one fails. If the active instance becomes unhealthy, the instance automatically fails over to the standby instance, making it active.
- Disable High Availability: Creates a single load balancer instance.
4. Network Settings:
- Select the network where the load balancer will operate.
- Optionally, specify an IP address for the load balancer.
- If you want to select a Virtual Network that is connected to a Physical Network via a Router, in this case you can assign a floating IP to the Load Balancer. You can choose the available Floating IP or create a new one.

- If you selected a shared physical network with both IPv4 and IPv6 subnets,you need to choose the IP version that will be used for the load balancer.

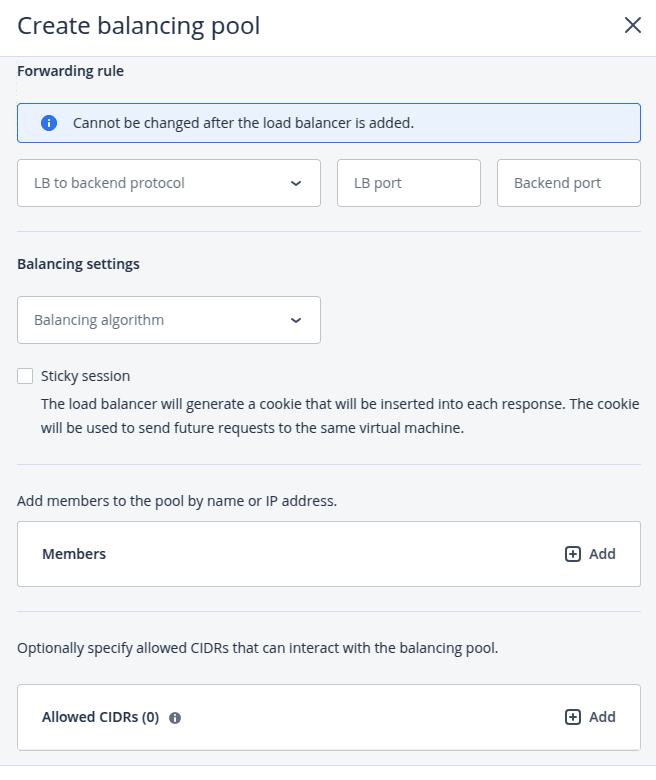
5. Create Balancing Pool:
Balancing pools distribute traffic from the load balancer to your virtual machines (VMs).
Steps:
a) Forwarding Rule: Choose how the load balancer should forward traffic:
i) HTTPS -> HTTPS
- Specify ports for incoming and destination connections.
- Ensure that all virtual machines have the same SSL certificate (or a certificate chain).
- Enable the PROXY protocol version 1 to add a human-readable header with connection information (the source IP address, destination IP address, and port numbers) as a part of the request header.

ii) HTTPS -> HTTP
- Specify ports for incoming and destination connections.
- Upload an SSL certificate (or a certificate chain) in the PEM format and a private key in the PEM format.
- [optional] Choose HTTP headers to insert into the request.
- [optional] Enable the TLS encryption to re-encrypt traffic from the load balancer to its members.
- [optional] Enable the PROXY protocol version 1 to add a human-readable header with connection information (the source IP address, destination IP address, and port numbers) as a part of the request header.

iii) HTTP -> HTTP
- Specify ports for incoming and destination connections.
- [optional] Choose HTTP headers to insert into the request.
- [optional] Enable the TLS encryption to re-encrypt traffic from the load balancer to its members.
- [optional] Enable the PROXY protocol version 1 to add a human-readable header with connection information (source IP address, destination IP address, and port numbers) as a part of the request header.

iv) TCP -> TCP
- Specify ports for incoming and destination connections.
- [optional] Enable the TLS encryption to re-encrypt traffic from the load balancer to its members.
v) UDP -> UDP
b) Balancing Algorithm: Select a method to distribute traffic:

- Least Connections: Sends traffic to the VM with the least active connections.
- Round Robin: All VMs will receive requests in the round-robin manner.
- Source IP: Requests from a unique source IP address will be directed to the same VM.
Sticky Sessions (Optional): Keeps users connected to the same VM by using a cookie. This feature is unavailable in SSL passthrough mode.
c) Add Members:
Add VMs to the pool by clicking Add Members. Only VMs connected to the selected network can be added.
d) Allowed CIDRs:
In the Allowed CIDRs section, specify IP address ranges in the CIDR format that will be allowed to interact with the balancing pool. This will limit incoming traffic to the specified IP addresses, any other incoming traffic will be rejected.
e) Set Up Health Monitoring:

Health monitoring ensures that only healthy VMs receive traffic. Choose a Monitoring Protocol:
- HTTP/HTTPS: Checks for a 200 response from the VM. Specify the URL path to monitor.
- TCP/UDP: Checks the connection on the backend port.
- PING: Checks the VM’s IP address.
6. Click Create to finish setting up your load balancer.
Managing balancing pools
To see a list of balancing pools in a load balancer, click its name.

Following actions can be performed while Managing a Balancing Pool.
1. Viewing and Monitoring
- View the list of balancing pools by selecting the load balancer’s name.
- Monitor performance and health on the Overview tab.
- Review parameters on the Properties tab.
- Manage pool members on the Members tab.
- Configure allowed IP ranges on the CIDRs tab.
2. Creating a New Balancing Pool
- Click Create balancing pool.
- Select a forwarding rule (e.g., HTTPS → HTTPS, HTTP → HTTP, etc.).
- Configure balancing settings:
- Choose a balancing algorithm (Least connections, Round robin, or Source IP).
- Enable sticky sessions if needed (not available in SSL passthrough mode).
- Add members (virtual machines) to the pool.
- Set allowed CIDRs to limit traffic to specific IP ranges.
- Configure a health monitor to check member availability (HTTP/HTTPS, TCP/UDP, or PING).
- Customize health monitor parameters (interval, timeout, healthy/unhealthy thresholds).
- Click Create to save the pool.
3. Editing a Balancing Pool
- Edit balancing settings:
- Change HTTP headers, TLS encryption, balancing algorithm, or session persistence.
- Edit allowed CIDRs to modify IP ranges that can interact with the pool.
- Edit health monitor parameters for more precise monitoring.
4. Adding Members to a Balancing Pool
- Open the desired balancing pool.
- Click + Add members to add new virtual machines to the pool.
5. Removing Members from a Balancing Pool
- Open the balancing pool and remove unwanted members from the Members tab.

6. Removing a Balancing Pool
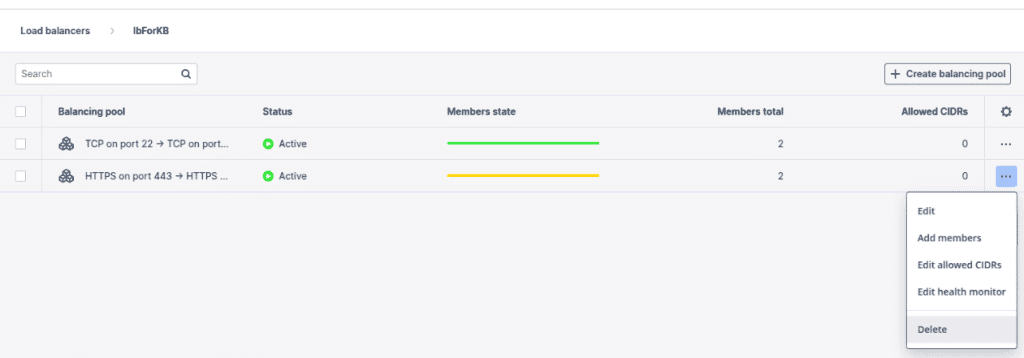
- Click the ellipsis icon next to the balancing pool and select Delete.
- Confirm deletion in the confirmation window.

Monitoring load balancers
To monitor performance and health of a load balancer
Open the Overview tab on the load balancer right pane. The following charts are available:
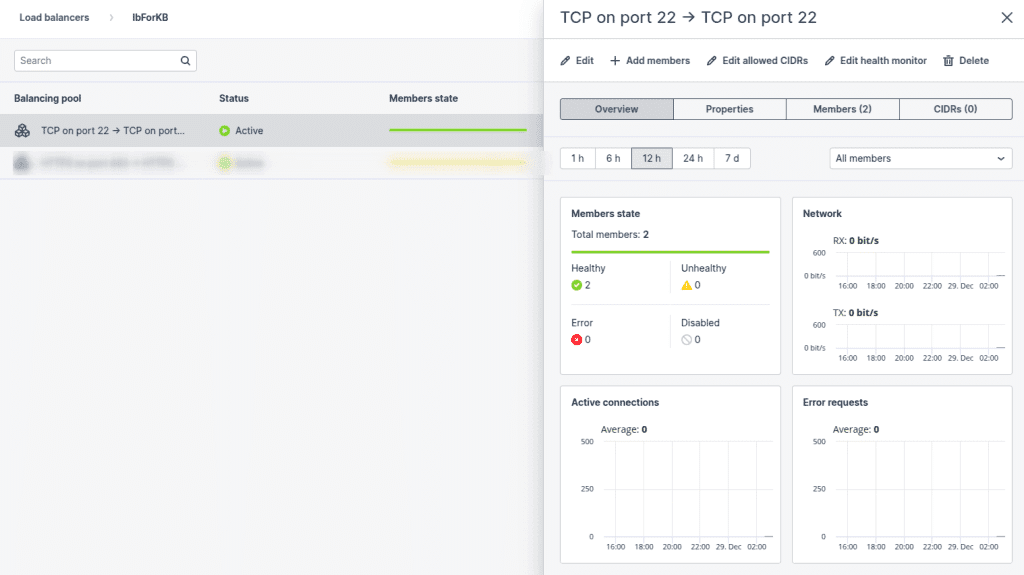
Members state
The total number of members in the balancing pools grouped by status: “Healthy,” “Unhealthy,” “Error,” and “Disabled”.
Network
Incoming and outgoing network traffic.
Active connections
The number of active connections.
Error requests
The number of error requests.
Modifying and Deleting Load Balancers
To edit the name or description of a load balancer

- On the Load balancers screen, click a load balancer you want to edit.
- On the load balancer right pane, click Edit.
- In the Edit load balancer window, modify the name or description, and then click Save.
To disable or enable a load balancer
- On the Load balancers screen, click a load balancer you want to change.
- On the load balancer right pane, click Disable or Enable, depending on the load balancer’s current state.
To remove a load balancer
- On the Load balancers screen, click a load balancer to delete.
- On the load balancer right pane, click Delete.
- Click Delete in the confirmation window.