Cloudpe is a computing service with a web management panel. This page describes the typical network configuration needed to connect to the Internet and to expose compute resources to the public.
A virtual router connects one or multiple private networks to one public network. The virtual router can route traffic between private networks and perform source address translation of private IPs into public to enable internet access for the private networks. In addition, the virtual router can perform destination network address translation to expose a private IP as public.
A floating IP is the feature of a virtual router to expose a private IP as a public IP. It binds one virtual machine’s private network port to one public network IP.
Exposing multiple private ports via a single floating IP with a Load Balancer feature is also possible. The load balancer is a particular virtual instance with HAproxy that redirects network traffic to multiple members according to the balancing policy.

Preparing Project Networking to Create Virtual Machine with Access to the Internet
A regular undertaking’s organization should comprise of a virtual confidential organization and a virtual switch that interfaces it to the public organization. To do it, you should make a virtual confidential organization, virtual switch, and virtual machine (allude to Making Virtual Machines). Then interface your virtual machine to your confidential organization.
Creating a Virtual Private Network
- On the Networks screen, click + Create virtual network.
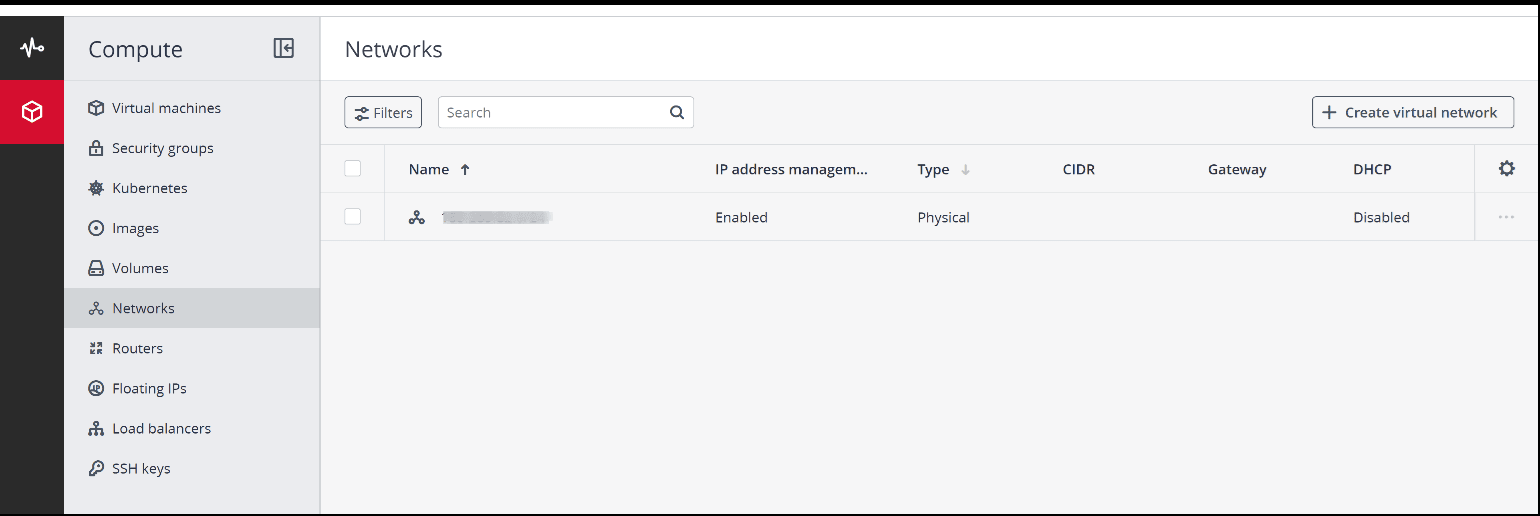
- On the Network configuration step, do the following:
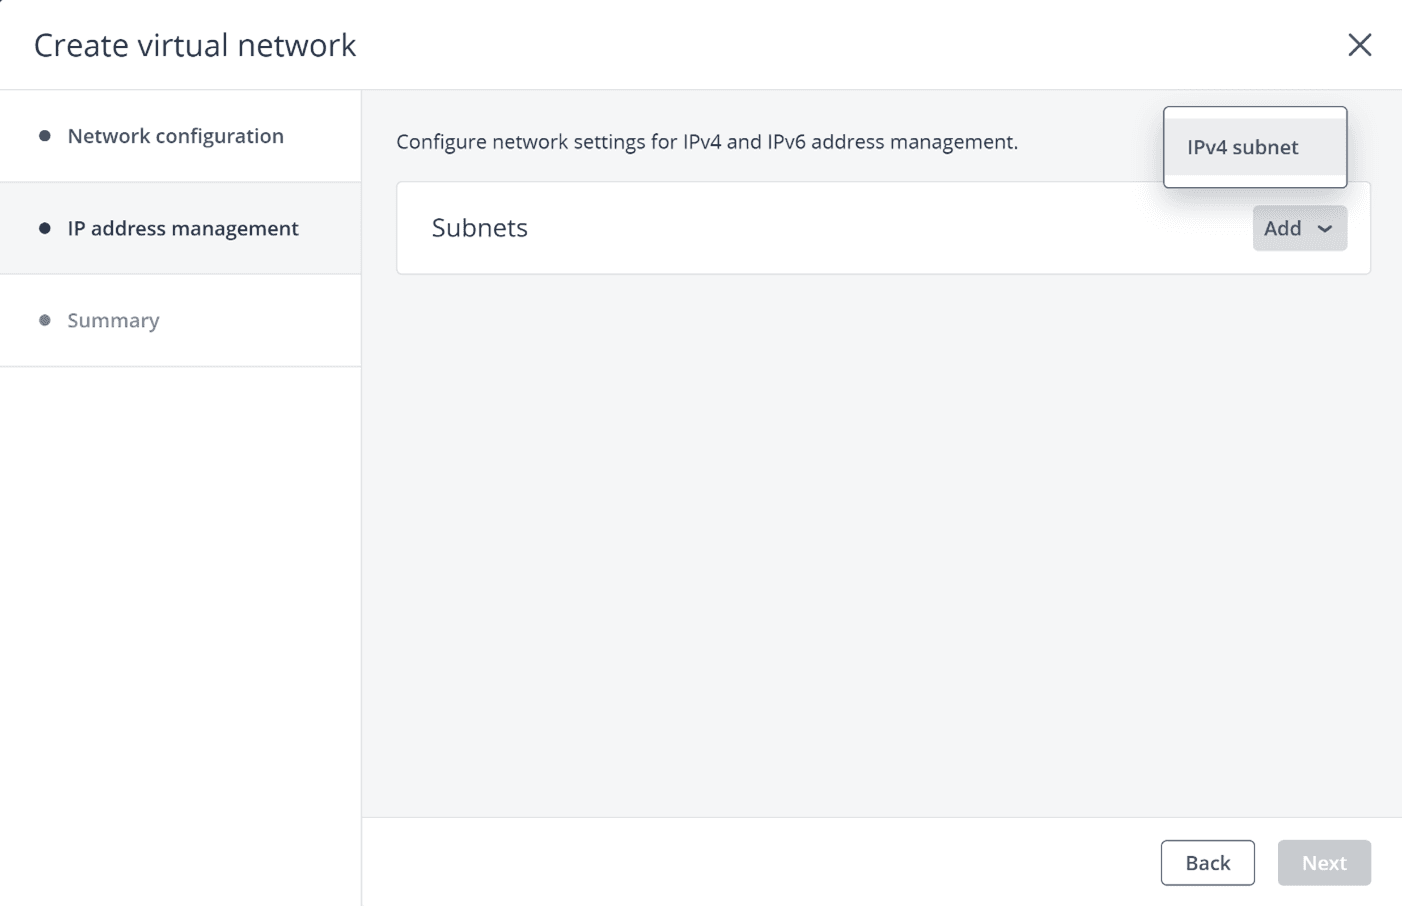
- When IP address management is enabled, you will move on to the IP address management step:
- In the Subnets section, click Add and select IPv4 subnet.
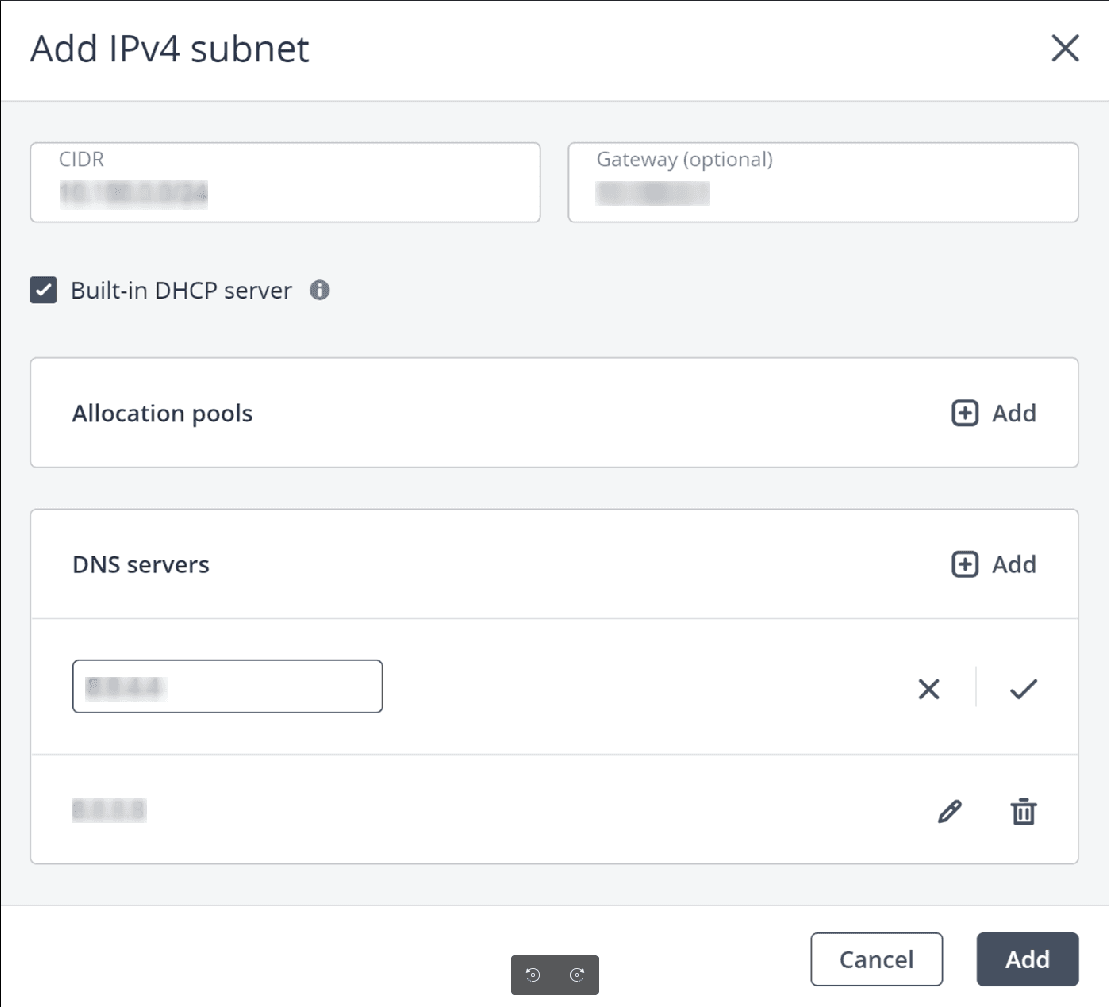
- In the Add IPv4 subnet window, specify the network’s IPv4 address range. The CIDR must be of some private range. For example, 10.100.0.0/24.
- Specify the gateway, which is a placeholder IP for the virtual router. It can be any IP within the CIDR range—for example, 10.10.0.1.
- Select the Built-in DHCP server checkbox to enable delivering the IP for VMs. The DHCP server will take the first two IPs from the allocation pool.
- Specify one or more allocation pools. The allocation pool is an optional configuration to set only needed IP ranges within the CIDR range. When not provided, the allocation pool is equal to the CIDR range. Typically, you do not need to configure it, only if you want to exclude some IPs from being issued by providing narrowed pool range.
- Specify DNS servers. They must point to some existing DNS services.
- Click the Add button.
- Click Next.
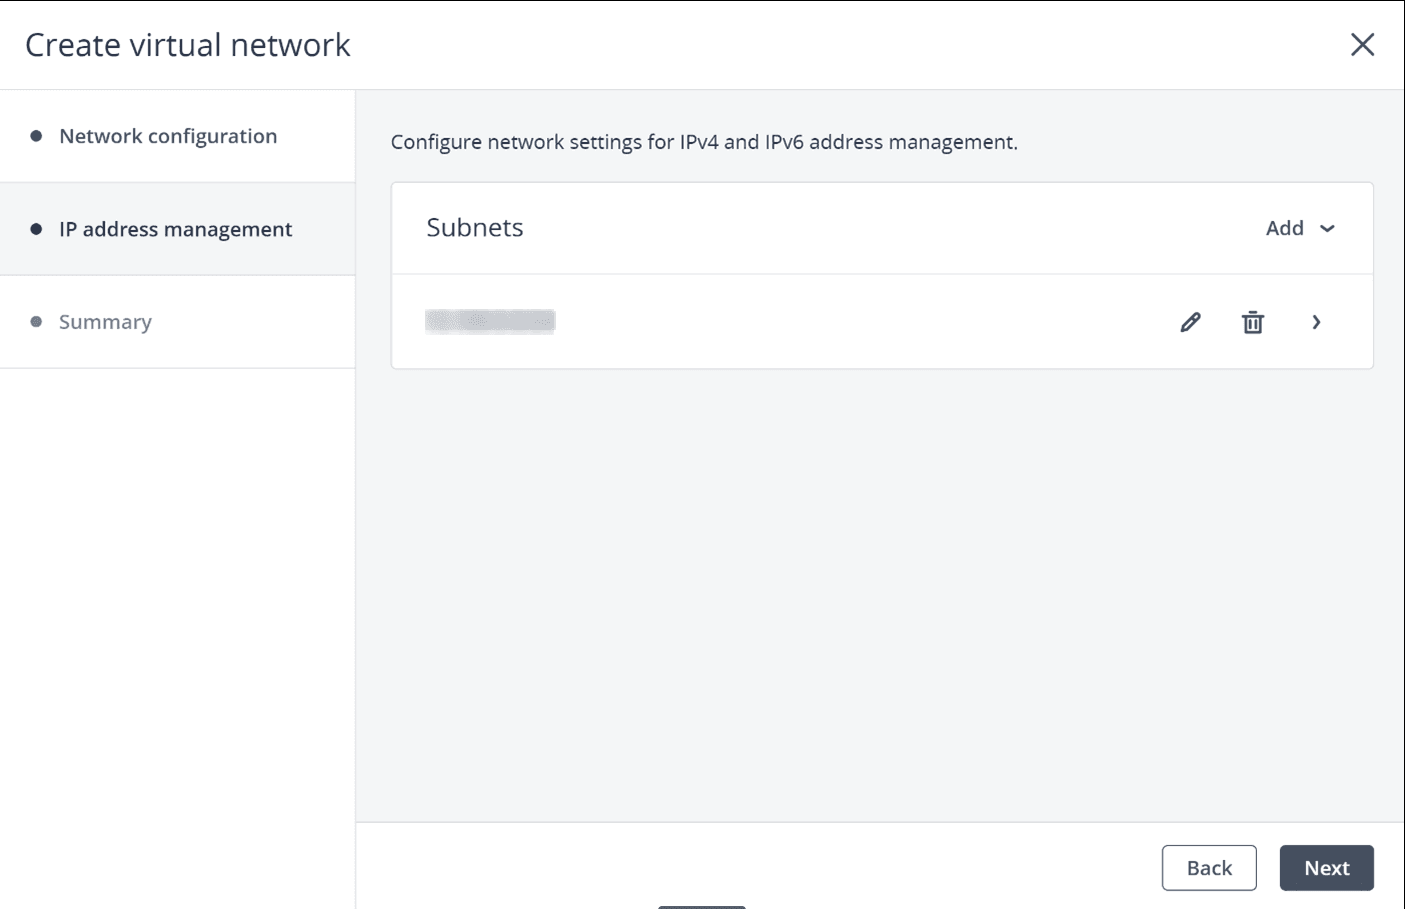
- In the Subnets section, click Add and select IPv4 subnet.
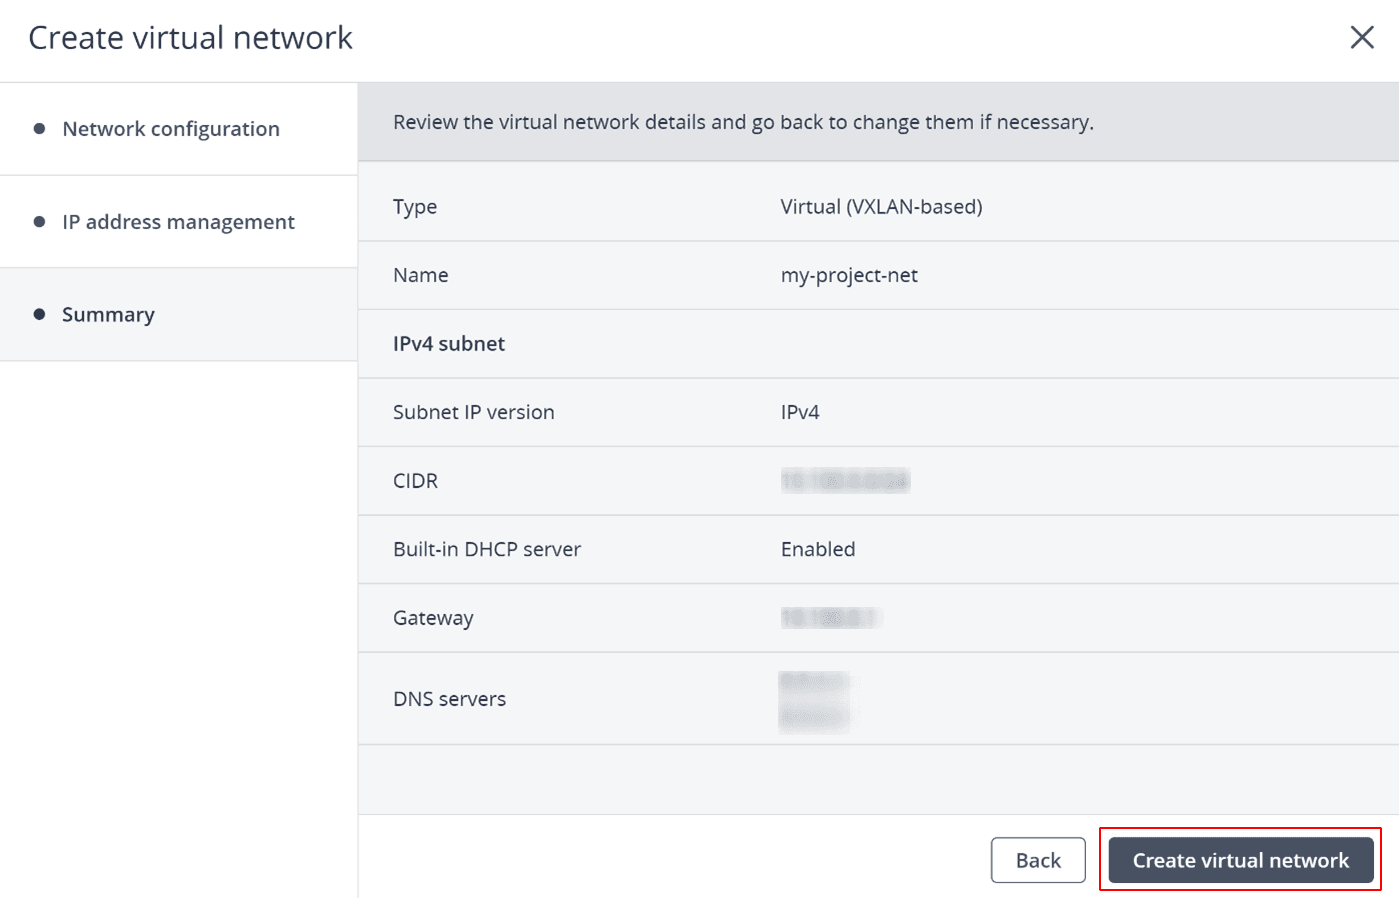
- On the Summary step, review the configuration and click Create Virtual Network.
Creating Virtual Router
- Navigate to the Routers screen and click + Add router.
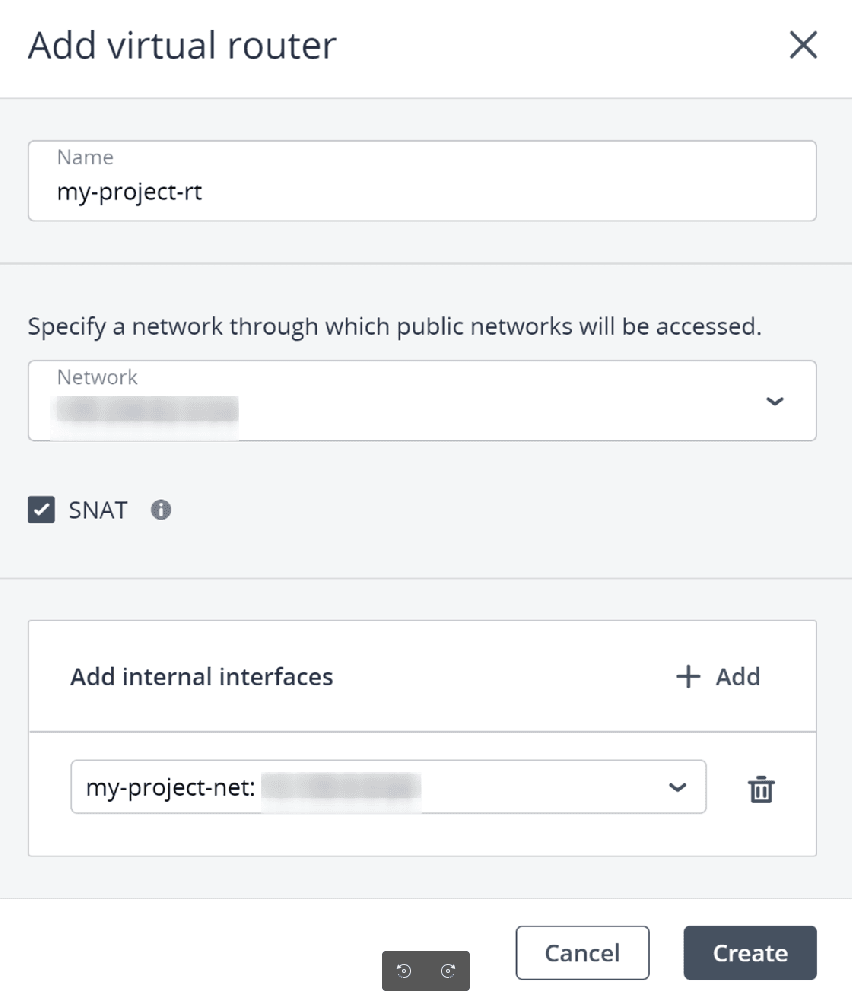
- In the Add virtual router window:
- Specify the name of the virtual router.
- On the Network dropdown menu, select an available public network through which public networks will be accessed.
- Select the SNAT checkbox to allow VMs in the private network to communicate with the Internet.
- In the Add internal interfaces section, select the created private network as an internal interface for the router.
- Click Create.
- Specify the name of the virtual router.
Connecting Virtual Machine to Private Network
On the Virtual machines screen, click the expected virtual machine.
On the Outline tab, click Alter in the Organization interfaces segment.
In the Organization interfaces window, click Add to join an organization interface.
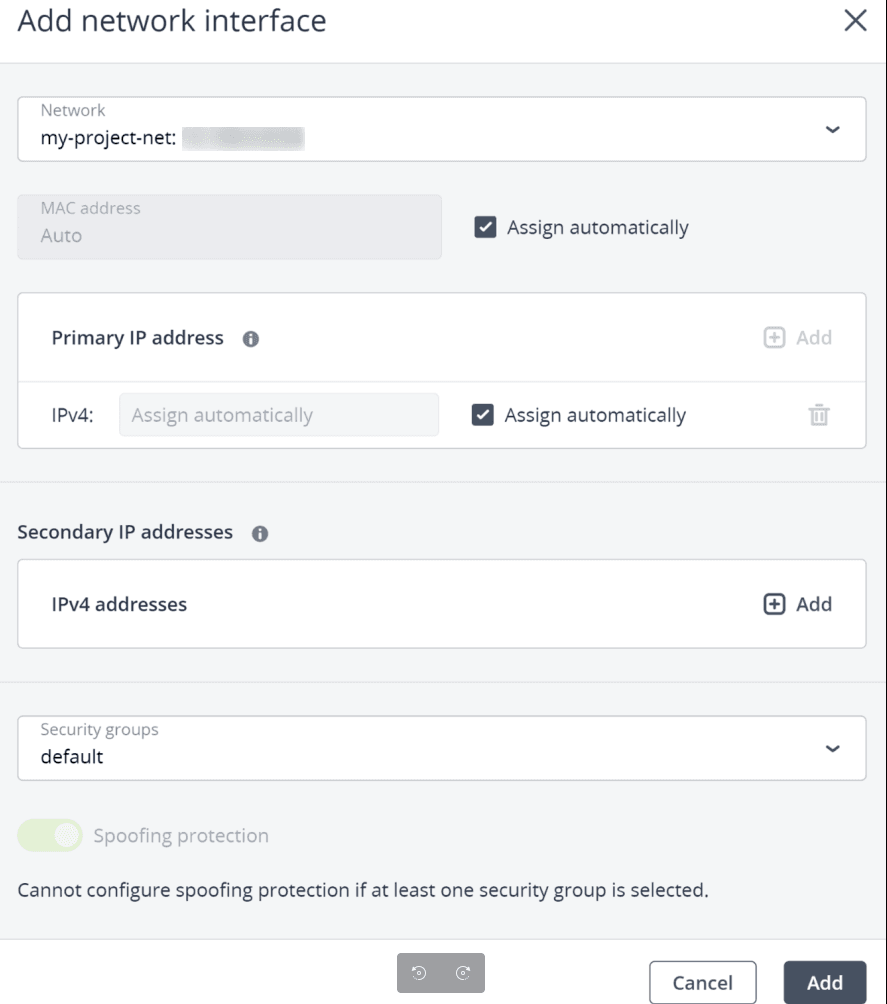
In the Add network interface window:
Select a figure organization to interface with. As a matter of course, Macintosh and essential IP addresses are relegated consequently. To determine them physically, clear the Appoint naturally checkboxes and guarantee that free IP and Macintosh are chosen.
An optional IP can be utilized by applications inside the VM.
A security bunch is a port firewall rules list; a shortcoming opens all associations. The default security bunch is chosen as a matter of course. Make different principles on the Security bunch tab whenever required. Kindly allude to Overseeing Security Gathering Rules.
Ridiculing assurance is empowered naturally. It is a security highlight that blocks active traffic with source Macintosh and IP tends to that contrast based on what was characterized previously. Debilitating the caricaturing insurance likewise implies incapacitating any firewall control. Try not to debilitate the parodying security. Whenever required, deselect the security bunch.
- Click Add.
- Click Done to finish editing VM network interfaces and save your changes.
The resulting VM will be able to reach the Internet, and you can access it via the console from the self-service panel.
Exposing Virtual Machine to the Internet
Prerequisites:
- You already have a private network and a router connected to it, and a virtual machine running with a network port.
Floating IP is an IP from the public range assigned to a VM’s port in a private network.
To create and assign a floating IP address to a virtual machine:
- On the Floating IPs screen, click Add floating IP.
- In the Add floating IP address window, select a network to pick a floating IP from, VM, and port.
- Click Add.
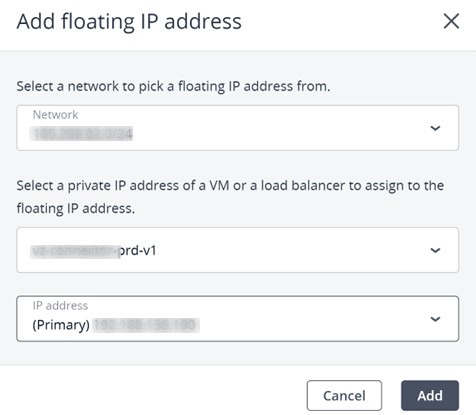
On the Floating IPs screen, you will see what public IP you received. This public IP will be bound to the project even if the virtual machine is destroyed. An unassigned floating IP is a floating IP not connected to any VM. It can be used later on by assigning a VM or a load balancer to it, or it can be deleted. In this case, this IP will be lost for the project.
Using Load Balancer to Expose Service Running on Multiple Virtual Machines
A load balancer is a particular virtual instance with configured HAproxy service that redirects specific traffic to the members’ group.
So, if a floating IP is a way to expose one VM to the public, a load balancer is the tool to expose a service running on multiple virtual machines. If you want to expose an HTTP service running on port 8080 in two VMs into one public IP and port 80, do the following:
- On the Load balancers screen, click + Create load balancer.
- In the Create load balancer window, do the following:
- Specify a name and, optionally, a description.
- High availability means using two instances of load balancers in the active-backup mode. If high availability is disabled, a single load balancer will be secured with the default platform high availability mode when a VM gets restarted on a new HW node in case of HW failure on the initial node.
- Specify a name and, optionally, a description.
- In the Network settings section, select the network in which you have your service’s VMs.
- Select the Use a floating IP address checkbox if you need to expose the service to the public, and then choose to use an available floating IP address or create a new one.
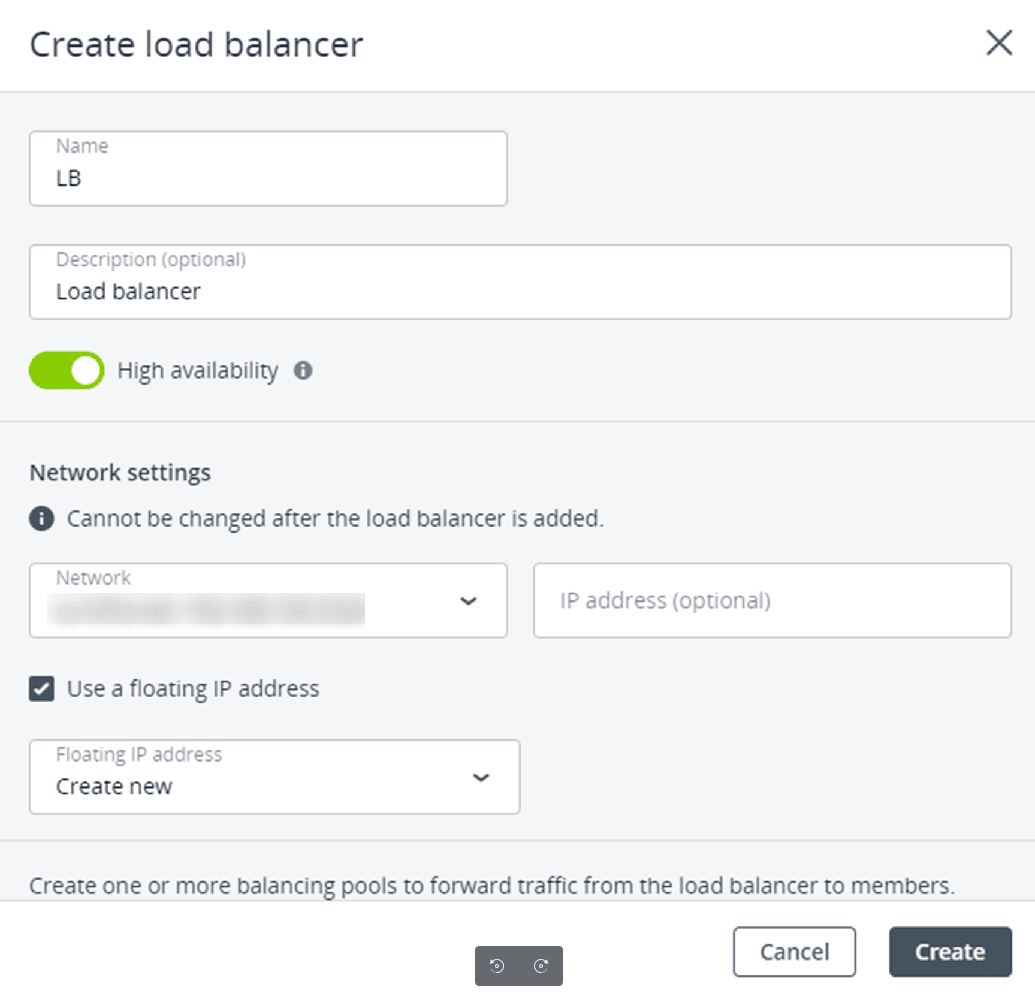
- Select the Use a floating IP address checkbox if you need to expose the service to the public, and then choose to use an available floating IP address or create a new one.
- In the Balancing pools section, click Add to create a balancing pool to forward traffic from the load balancer to virtual machines.In the Create balancing pools window that opens, do the following:
- In the Forwarding rule section:
- Select the protocol which is your service networking protocol, such as HTTP/HTTPS, TCP, or UDP.
- Specify the LB port a front-facing port that you will use to connect from outside.
- Enter the back-end port, a service port on your virtual machines.
- Select the protocol which is your service networking protocol, such as HTTP/HTTPS, TCP, or UDP.
- In the Balancing settings section, select the balancing algorithm that determines how data flow will be balanced between the back-end virtual machines:
- Source IP algorithm. It will guarantee that an external client (if its IP does not change) will be directed to the same back-end host.
- Round-robin. It will direct each packet or session (for session-level protocols) to different back-end hosts.
- Source IP algorithm. It will guarantee that an external client (if its IP does not change) will be directed to the same back-end host.
- Turn on the Sticky session toggle to balance the session’s level protocols, such as HTTP/HTTPS, to send the packets of the same session to the same back-end host.
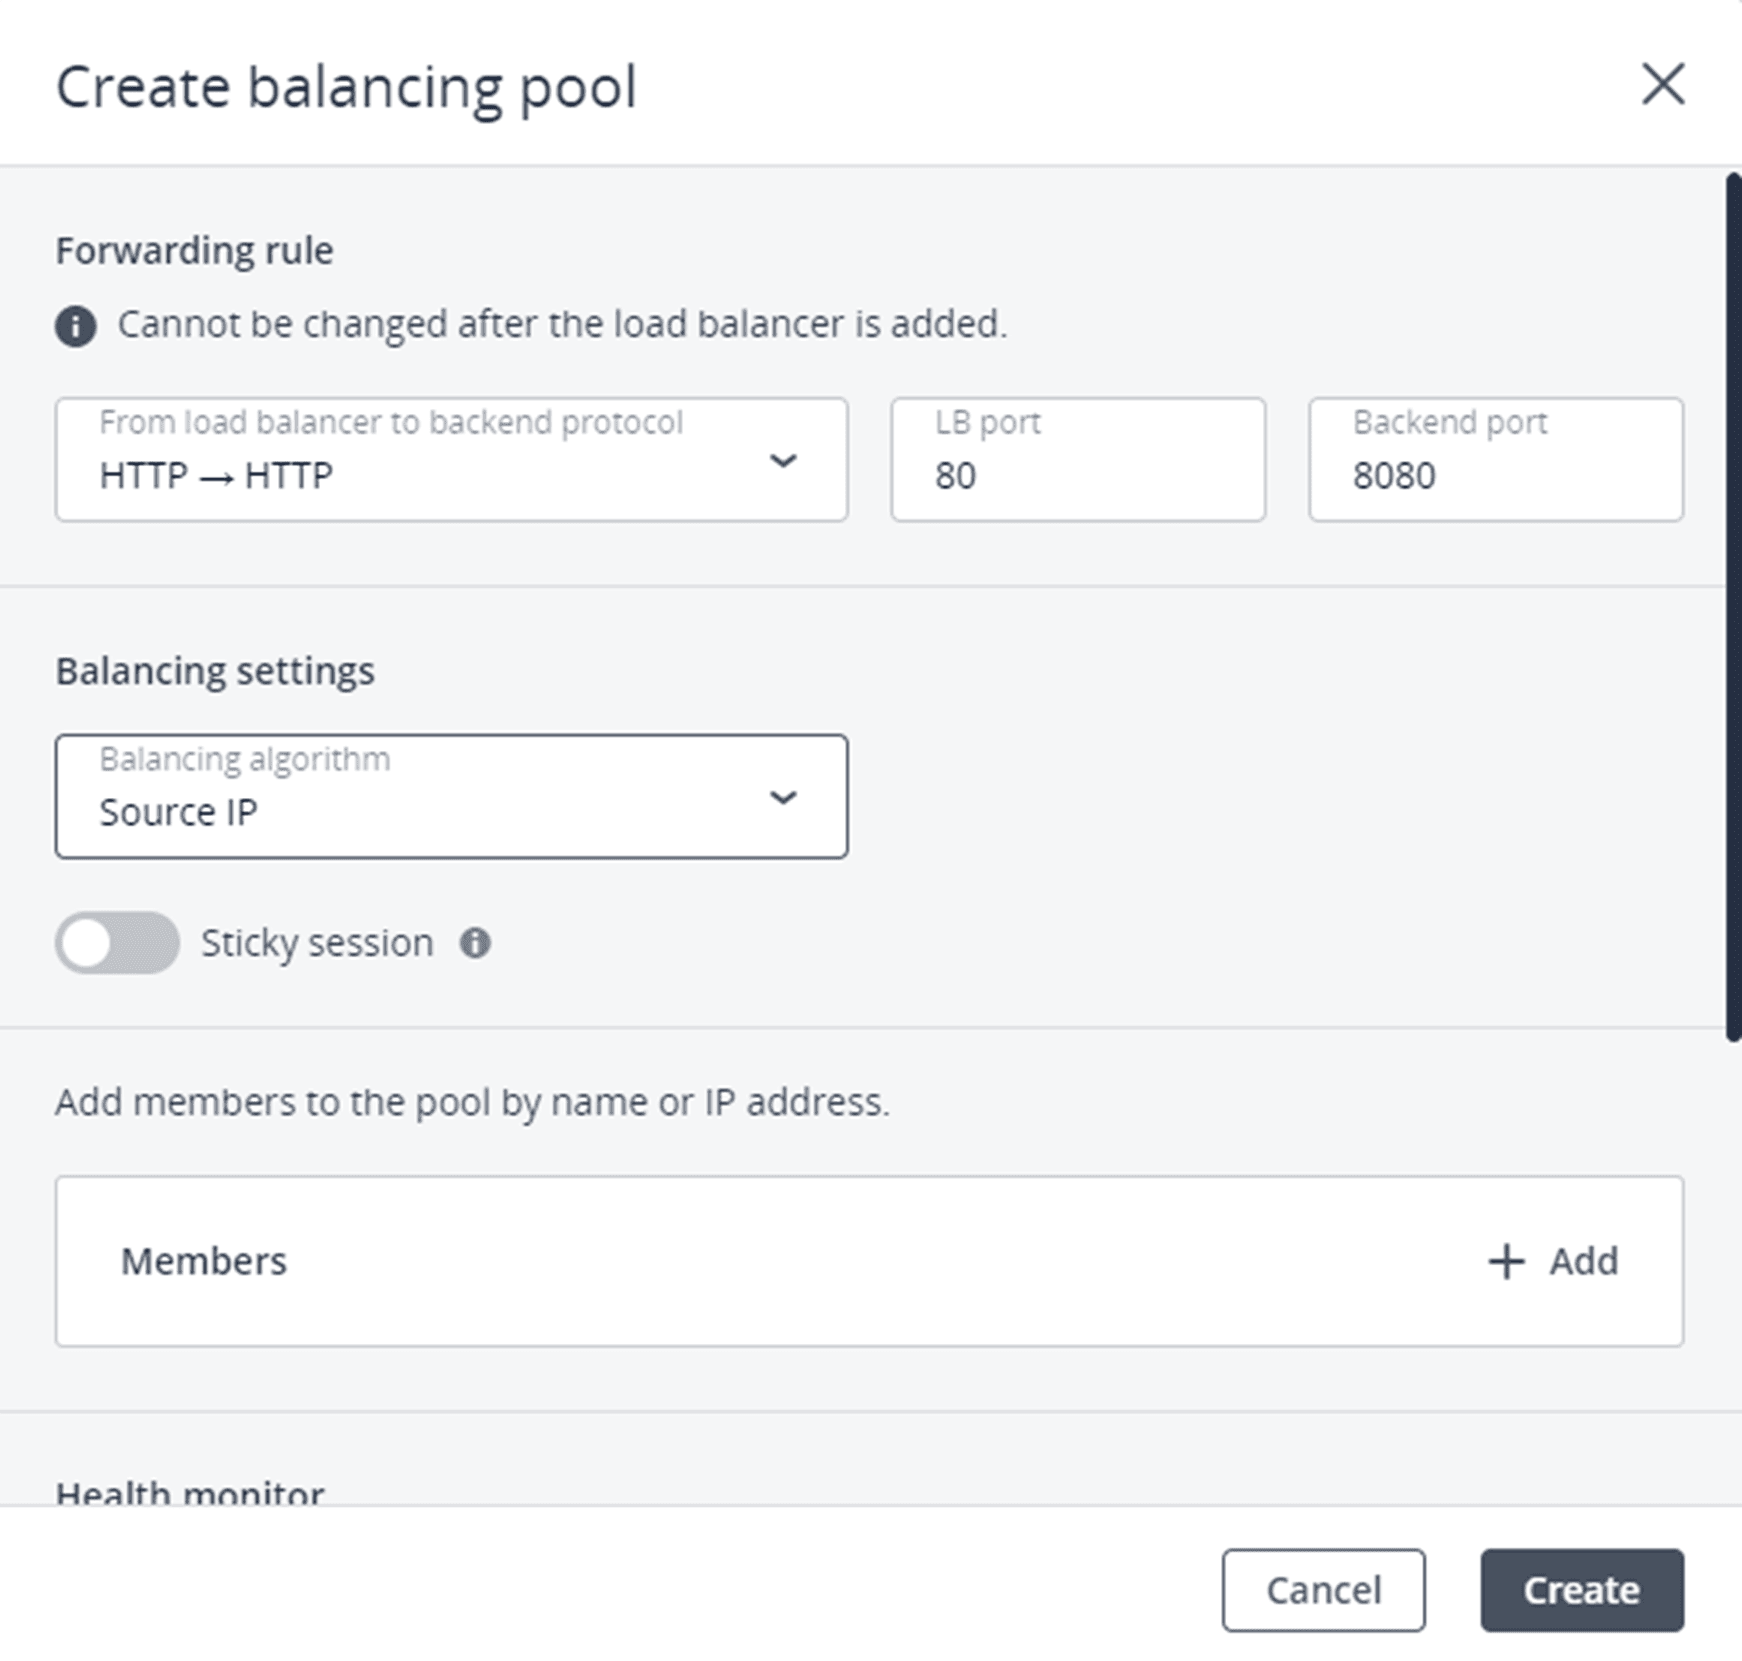
- In the Forwarding rule section:
- Click Create.
Once created, a load balancer exposes your service to the public.
